Saturday, December 8, 2012

Happy Mail

A little more happy mail to share with you today.
This time it is "vintage" 7 gypsies. I just love all the graphic elements of this paper pack. When a friend told me she had this in her stash
{UNUSED!!!!}
I suggested that it would get used, and quickly in my stash. She sent it right over.

The six Sew Easy heads by WeRMemoryKeepers are just as thrilling. Can't wait to show you some projects featuring these lovely tools!
 
~charity~

Friday, December 7, 2012

Advent Box Tutorial

We scrappers love to come up with ways to reinvent time proven traditions. Today I have an advent box that I designed around two Kiwi Lane Design templates. I saw the hexagons in their shop and could feel the inspiration bubbling up!
 
Treat Boxes
 
Supplies:4 12 x 12 sheets heavy cardstock
strong adhesive
scissors
scorer
Kiwi Lane Designs Template: Shapes 6T (large hexagon)

Instructions:
Step 1: Trace 6T on a 12x12 sheet of cardstock. If the template is lined up as shown, 12 templates will fit on a single sheet. You will need to trace the template 48 times to get the tops and bottoms of your treat boxes.
Step 2: Cut out the hexagons, being careful to keep edges straight and corners sharp.
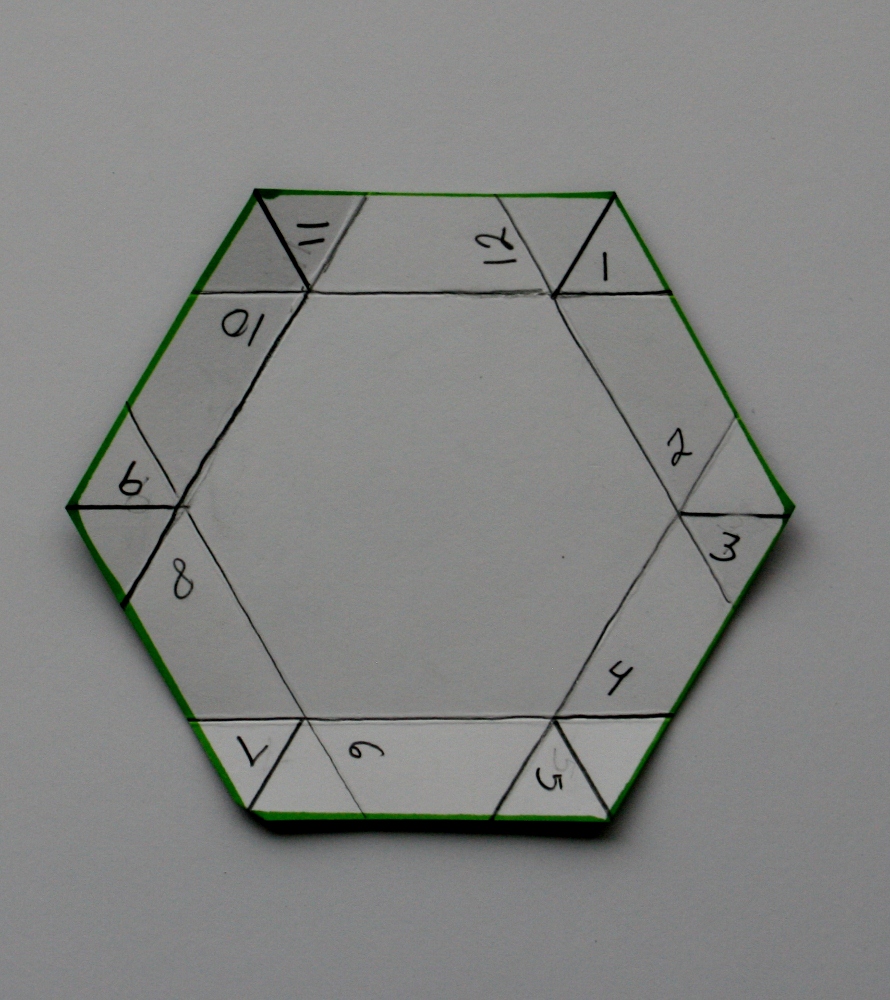
Step 3: For the top of the box score the perimeter of the hexagon 1/2 inch in from the edge. This will create a diamond shape at each corner. 
Step 4: Label the scored lines 1-12 as shown. Score the diamond shapes in half, creating two triangles at each corner.
Step 5: Cut each line below the odd numbers so that only one edge of the triangle is lose.

Step 6: Fold the scored perimeter up to form the box. Place adhesive on the odd numbered triangles and slip that behind the edge of the box nearest it. There should be an even number, a small triangle, and another even number showing with each corner you adhere. When you have completed the edge of the box all odd numbers will be hidden.
Step 7: For the bottom of the box score the perimeter of the hexagon 5/8 inch from the edge. Then follow steps 4-6 to complete the box.
Step 8: Add a small treat to the hexagon box and tie a scrap of twine or yarn to hold it closed. Add tiny type numbers to the boxes to indicate which day each will be opened.
Step 9:Place boxes 24, 23, and 22 in the small stacked box and the remaining boxes in the large stacked box.
 
Box Topper
 
Supplies:
Heavy cardstock
21 inches of 1/2 inch ribbon
3 hook and loop fasteners
Kiwi Lane Designs template 2T
 
Instructions:
 
Step 1: Trace and cut 2T.
Step 2: Cut the ribbon into 7 inch lengths, adhere the hook portion of the fasteners to the tips of the ribbon. Adhere the other ends of the ribbon so that they meet in the middle of the hexagon.
Step 3: Adhere the loop portion of the fasteners to the bottom of the large stacking box.
Step 4: Adhere 3 paper roses to the top of the hexagon. Instructions for making paper roses can be found in this blog post:
Step 5: Assemble the boxes and place topper so that the boxes are held together.

As you can see, these are only the instructions for the treat boxes and for the topper. Because of the length and intricacy of the instructions for this advent box I spread them out across three blogs. You will find the instructions for the smaller stacked box here:
Practical Scrappers
and the instructions for the larger stacked box here:

Kiwi Lane Designs
I hope you've enjoyed this project. It was LOADS of fun to design. I'd love it if you'd link your project to my blog when you've finished!!!

~charity~

Thursday, December 6, 2012

Rose Tutorial

After posting my Chandefleur in August I received several requests for paper flower tutorials. Today I have the instructions for making the red rose in the front on the lowest tier.
Supplies:
Paper Piercer
Petal Punch
1 sheet patterned cardstock
Hot Glue
Glitter Glue
Gem
Step 1: Punch 15-20 petals from a sheet of cardstock. Roll the petals around the handle of a paper piercer or pencil.
Step 2:Pinch the pointed end of three of the petals so that the desired pattern is on the "outside."
Step 3:Adhere these three petals together to form the center of the rose.
Step 4:Pinch the pointed end of three petals together so that the desired pattern is on the "inside."
Step 5:Adhere these three petals to the edges of the first three petals, around the center of the rose.
The underside of the rose will look like the above photo. I have inked the petals for definition.
Step 6:Choose three more petals and adhere them in an alternating pattern to the second three petals. I have highlighted the third set of three petals with green.
Step 7:Choose 6 petals and adhere them in an alternating pattern to the third set of three petals. This should complete the rose. If it doesn't look full enough, continue to add petals where desired.
Step 8:Embellish the tips of the petals with glitter glue and the center with a gem.

 For my petals I used the Punch Bunch medium ovoid petal punch.
It can be purchased on line at the following retailers:
 
Supplies:
Paper and Gem:MME
Ink:CTMH
Highlighter:Sharpie
Stickles:Ranger
Punch:Punch Bunch
Paper Piercer:Making Memories
 
~charity~


Wednesday, December 5, 2012

Stair Crazy

We all know that any scrapping mistake can be fixed with just a little more embellishing. But what's to be done with the damaged components? Right in the middle of this lovely blue sheet of paper my punch got stuck and in trying to get it undone, my paper tore!!! Since I didn't have another sheet of that blue I had to cover the mess with a photo. I used the torn piece as a seperate design element on the upper left corner.
I pretty much LIKE it!
~ Stair Crazy~
This layout is the companion page to yesterdays post:
 
Supplies
Punch:Martha Stewart
Ink:CTMH and Color Box
Metal Brads:Stash
All Others:MME
 
Sketch
 
~charity~

Tuesday, December 4, 2012

These 2 Are...

I just got my first pack of MME Lost and Found 3 in. I so love the blues and yellows together!!!
This layout is for the Scrappy Friends blog challenge. This month the ladies choose NOEL as their inspiration.
N-Kerys challenge is to use a Number in the title.
(Title:These 2 are...)
O-Kristy's challenge is to use something Oval on the layout.
(I traced and cut ovals onto chipboard)
E-Rochelle's challenge is to use at least 5 Eyelets on the layout.
(I laced 10 eyelets with twine)
L- Brenda's challenge is to use a List of at least 3 things or Lined paper.
(I numbered 1,2, and 3 subtitles and used plaid paper)
~ These 2 are...
Because this is a double page layout the title is a little confusing. Return tomorrow to see what these two are crazy about!
Supplies:
Brads and Eyelets:Stash
Ink:Close To My Heart
Alpha:American Crafts
Tiny Type:Authentique
All Others:MME
 
Sketch:
 
~charity~
 

Monday, December 3, 2012

This Old Truck


Multiple photo layouts on The Paper Girls Challenge Blog today. Stop by the blog and get the details for Challenge # 21. Then join in the fun and link up your own project.
~ This Old Truck ~
I used a CTMH sketch and supplies for this layout of childhood memories. We spent hours playing on this truck.
Thanks to my brother for taking these great photos of this classic farm truck. He's the handsome fella in the photo below!
Supplies:
Tiny Type:Glitz Design
Alpha:Sticker Studio
Stamps:Hampton Art
Tags:Stash
All Others:CTMH

~charity~


Saturday, December 1, 2012

Naiad

 These sepia tone photos of my water baby enjoying the falls are definite favorites of mine. She looks so happy splashing in the foam. The words to the right of the photos are multi-national words for mermaid.
 ~ Naiad ~
Supplies:
Chipboard Alpha:Stash
Punch:Fiskars
Mist:Tattered Angels
Netting:Vintage
All Other Supplies:CTMH