Showing posts with label Scrappin' Chaos. Show all posts

Wednesday, August 21, 2019

How To Make a Prom Photo Into Home Decor

Today's project is a prom photo, embellished and framed for home decor. Tulle and silk brocade are joined by silver sequins, flashy trim, and music themed paper. Foiled paper flowers and medallions and even more glam to this hand painted frame.
~ Love Song ~
 The background is music themed cardstock with a navy tulle overlay. I used tiny metal brads for a tufted look. Here is how I accomplished that.
1) Pierce holes in paper at regular intervals with offset rows.
2) Lay large piece of tulle over paper so that it extends beyond each side by a few inches.
3) Beginning at center of paper insert brad through tulle and paper, twist to right one full turn then secure.
4) Work out from center brad placing and twisting brads. Each horizontal row of brads is twisted the opposite way.
 I hot glued rhinestone trim to the bottom edge of the tulle. When it cooled I added half a portion of Royal Highness SMS Sequins. An identical rhinestone band of trim was hot glued to the top. The sides of the tulle were folded to the back of the cardstock and hot glued there. When everything was sealed and cooled I shook the sequins around until they filled the tulle pocket. 
 The flowers on this photo are made of Rinea Foiled Paper. I used both Sapphire and Silver Starstruck Foiled Paper with Sizzix Dies. The first three flowers have petals curled up. The second three have petals curled down. 
 Chipboard leaf flourishes are painted with metallic Tiffany blue and scattered with the foiled paper flowers. A strip of silk brocade from the dress is wrapped into a rose and crowns the arrangement.
Glossy silver and turquoise foiled paper is layered under the photo. I used a Spellbinders die to cut the pieces for the mosaic medallion. Stickers, gemstones, and a chipboard alpha complete the layout.
 The rainbow flash of these amazing sequins is so hard to get with a camera. Here's a little corner of what it looks like in person. Glamour and class are the order of the day.
The wood frame is an 11x14" thriftstore find. I sanded the finished wood then painted it grey. When that dried I dry brushed silver over the top. After several layers and a few mistakes it looks just right! This Home Decor project is my entry for the August challenge at Nomadic Soul Diaries. Find them on Instagram and view the stunning inspiration!

Supplies:
Cardstock: Echo Park Melody Of Life, Craftsmith
Foiled Paper:Rinea
Trim:Webster's Pages
Sequins: Spiegel Mom Scraps
Chipboard Flourish:Gypsy Soul Lasercuts
Dies:Sizzix, Spellbinders, Crafter's Companion
Alpha:My Mind's Eye
Crystal Gemstones:Michael's
Stickers, Journaling Cards:Echo Park Melody of Life
Paint:Plaid, Calambour

Craft On
~charity hotrum~

Wednesday, August 14, 2019

Blush and White Monochromatic Scrapbook Page

This blush and white, monochromatic page celebrates my daughters first Art Show at school. She was 7, into bright colors, and excited about her work. The photo has so many colors I needed to use a muted palette to let it shine. The blush, white, and pops of grey put my girl and her painting front and center!
~Art Show ~
For the background I used repeating, off set half circles of punched paper. I also stamped eyes with stylized lashes in peach tone ink. The stamp is from Pink Ink Designs Thalia set.
I added a bit of sparkle with the Rose Glory sequin mix by Spiegel Mom Scraps. Just little bits of glimmer here and there. The keys, the banner, and the hot air balloon each have a different type of sequin.
A cluster of Prima flowers enhance the lower right corner. I didnt' have leaves in the color scheme so I cut up a velvet flower. Creative Embellishment's laser cut gears peak out from behind the flowers, the banner, and either corner of the photo.
I didn't choose a particular theme for the diecuts. I was looking for a filigree style to mesh with the eye stamp. The wood shapes pop the photo up off the page for depth.
Stop by my Instagram for more crafty inspiration.

Craft On!

~charity hotrum~


Wednesday, August 7, 2019

Mermaid Birthday Cards With Watercolor Details

This pair of mermaid themed birthday cards has lovely watercolor details and a fun sentiment. Pink Ink Designs Stamps have intricate designs, heavy on the flourish and smooth on the charm. They have become my new guilty pleasure. 
~ I SEA It's Your Birthday ~
The jewel tone card is layered with Glossy Violet/Gold Foiled Paper by Rinea. The mermaid and sentiment are from the Sea Nymph stamp set. The shell and seahorse are from the Shell Nymph stamp set. I fussy cut her two little friends and used foam tape to pop them up.
The pastel card is layered with Starstruck Jade Foiled Paper by Rinea. The fancy fish is from the Mermaid stamp set. Both card blanks are cut and folded from Craftsmith paper.
If you get an opportunity to sea Pink Ink Designs stamps in person you will be delighted. The detail and quality is stunning. Here's a link to the UK shop: Pink Ink Designs UK.
The watercolors I used are from Close To My Heart.
Stop by my Instagram for more crafty inspiration.

Craft On!

~charity hotrum~

Thursday, August 1, 2019

How To Update a Metal Sign With Foiled Paper

I used Rinea foiled paper and Prima Flowers to update this metal sign for my craft room. I found it one day while out thrifting. I have always planned to give it some pizzazz and alter the message a bit. Having just updated my crafting space I knew it was finally time to get to this project.
I absolutely love the pale green color of this sign. The pressed metal has a great embossed design and the whole thing centers nicely on my crafting desk. The title doesn't quite fit though.
I used the Mini-WeRMrk Alphabet Punch board to make new letters. The embossed Starstruck Jade Foiled Paper from Rinea is the exact color of the sign. It cut and punched beautifully.
I sanded the sign and adhered Glossy Copper/Gold Foiled Paper from Rinea to the center. I then added the letters. Helmar adhesive is a fantastic all-purpose adhesive that doesn't leave wrinkles and worked great with the metal and glossy surfaces. 
I like bling so I ran a strip of copper and green washi tape around the border of the Glossy Copper/Gold Foiled Paper . 
It was looking a little bare so I added paper flowers and leaves. I was still on the green kick so I found some green and gold marbled flowers and set them off with white flowers and tawny leaves.
Here is the finished sign in all its foiled paper glory!
Stop by my Instagram for more crafty inspiration.

Craft On
~charity hotrum~

Friday, July 26, 2019

How To Make a Mermaid Valentine Card With Stencils

Little did I know that when I posted this Mermaid Valentine card using Funfare Stencils that the technique I used to make the ocean and waves would interest so many people! This project was posted 4 years ago. I loved the process and am thrilled to share it for you again. It was a long and artsy process so settle in for a LIST of photos. 
~ Oceans of Love ~
Paper Supplies in Inches:
Heavy cardstock for card, 4x6
Medium to heavy weight cardstock for image base, 3.5 x 5.5
Scraps of paper for tearing. 7x3
Tear your paper scrap in half. Tear slowly and with lots of "dips".
Don't feel silly practicing this!
The torn paper is the key to the wave look.
Coloring Products:
 White embossing powder (Zing), white pigment ink (Clearsnap), and three colors of mist.
I used a mint green (Heidi Swapp), a teal (Tattered Angels)
and London Blue (Dylusions).
For tools you will need sponges or cotton rounds and a pointed stick (mine is for applying rubons).
Adhere the torn paper strip with the strait edge 1/4 of the way from the top. Apply the adhesive just to the ends so that no debris remains on the image base.
Mist the sponge with the lightest color and spread it on the base in a circular motion. The color should cover all the paper beneath the torn strip.
Repeat the process with the medium color but do not cover the entire paper.
Sprinkle the darkest color onto the base by removing the spritzer and tapping the tube. Be sure to cover the top of the base with a scrap paper to catch oops drips. Leave the drops on the paper about 10 seconds before spreading them in a circular motion.

 The base needs to be completely dry before begin this next step.
Using the pigment ink daub the base right at the edge of the torn paper. The width of the ink strip will be the width of the white caps on the waves.

Dust the ink with embossing powder. Tap off the extra and use a paintbrush to remove any unwanted portions. Use the stick to scrape circular lines in the powder. Heat to set. 
Place the mermaid stencil over the ocean and apply ink.
Dust with embossing powder, heat to set.

To complete my mermaid I used Clearsnap ink and WOW embossing powder. The Sentiment is MME and the sticker is Heidi Swapp. All papers used are Craft Smith.
I can't wait to see this technique showing up on projects!
Be sure to share.

Scrap On!

~charity~

Tuesday, July 16, 2019

How To Make an Unforgettable Anniversary Card

We all have that amazing couple in our life. The one that's deeply in love, thinks the world of each other, and has everything they could ever want. How do you celebrate their special day?
With an anniversary card as incredible as they are.
Endless Love
Supplies:
12x12 sheet of patterned cardstock
1 yard of twine
1 extra-length brad
yarn needle
Paper Trimmer
Paper Piercer
Border Punch
Directions:
Step 1. Cut 12 x 12 sheet of cardstock in half. Punch length of the paper with border punch.
Step 2. Cut punched paper into 1 x 6 inch strips. Use a corner rounder on the ends of the strips. This will make 12 ribs.
Step 3. Cut 2 strips of paper, 1.25 x 6.5 inches. Punch the tops with border punch and the ends with a corner rounder. This will make 2 guards. 
Step 3. Pierce a hole 1/4 inch from the end of the rib, at the center of the paper. Pierce a second hole 4 inches from the end and 1/4 inch from the left side of the rib. Pierce a third hole 1/4 inch down from the second hole. Use the first pierced rib as a guide for all the ribs to be sure the holes line up exactly.
Step 4. Pierce a hole 3/4 inch from the end of the guard, at the center of the paper. Lay the first pierced rib over the guard, line up the center, end holes. Pierce the top two holes using the rib as a guide.
Step 5. Stack the strips of paper so the holes line up and the ribs are sandwiched between the guards. Feed all the strips onto a brad and secure. 

Step 6. Tie a knot in the end of the twine. Beginning with the last guard string the twine through the two upper holes 2 times.
Step 7. Lay the first rib against the last guard so that the edges over lap just a little. String the twine through the two upper holes 2 times. Over-lap the next rib and repeat with twine. Knot the twine after the final guard has been stitched onto the fan.
Step 8. Decorate the top fan guard. Add sentiment to the fan ribs with tiny type.

Scrap On!

~charity~

Saturday, July 6, 2019

How To Make a Paper Circus Tent

Send In The Clowns!
The juggler, the trapeze artist, the tight rope walker...between my three kids my house is a three ring circus until bedtime. What better way to commemorate their death-defying acts then this circus tent mini-album? Don't be scared away by its intricate appearance. Just grab a chair and enter the lions cage, you know you are DYING to see if you've got what it takes!!!
Supplies:
Thick Cardboard
Patterned Cardstock
Compass or large Circle Cutter
Paper Trimmer/Scorer
Scissors
Stapler, Sewing Machine, or other instant lock Adhesive
Tent Base
Cut 1 Circle 9.5" Diameter of Small Flowered pattern paper
Cut 1 Circle 8.75" Diameter of Black Cardstock
Cut 3 Circles 7.5" Diameter. 1 of thick cardboard, 1 of patterned paper
Cut 2 Strips 1"x 11" of Black Cardstock
Directions:
Step 1: Trace 7.5" circle onto thick cardboard, cut out, adhere to center of 8.75" circle. Top with 7.5" circle of patterned paper.
Step 2: Score strips of patterned paper lengthwise. Cut slits in paper strips from edge to center at 1" intervals down one side. 
Step 3: Adhere strips to edge of large circle so that a narrow gap remains between the upright edge of the strip of paper and the cardboard circle. Overlap the strips by one inch so that a 2 inch gap is left at the opposite end of the circle.
Step 4: Trace a 7.75 " circle onto the center of the 9.5" circle. Cut out center so that only the edge remains. Place 9.5" circle over Tent Base to cover the paper strips and edge of the base. Adhere.
Tent

Cut 1 Circle 7.5" Diameter
Cut 8 Triangles {2.75x4.5x4.5} from Narrow Striped pattern paper
Cut 8 Trapezoids {3.25x4.5x2.25x4.5}Coordinating pattern paper
Cut 4 Rectangles {5x5.5} Wide Striped pattern paper
Directions:
Step 1: Score all Triangles at 1/8 inch on both 4.5" sides. Adhere scored 1/8 sides together with seams
on the outside.
Step 2: Score all Trapezoids at 1/8 inch on both 4.5" sides, and at 1/2inch on 2.25" side. Adhere scored 1/8 sides together to form second tent tier, leaving top 1/2 inch loose. Fold these 1/2 inch sections down and to the outside of tent.
Step 3: Trace 7 inch circle at the center of 7.5 inch circle. Cut circle from edge to traced line at 1/2 inch intervals. Fold flaps toward the center of the circle.
Step 4: Adhere flaps to inside of large end of second tent tier. This step will create a "ceiling" for the third tent tier to rest against.
Step 5: Adhere tent peak to second tier by placing adhesive on inside of folded 1/2 inch sections from step 2 and matching them up with undersides of the tent peak triangles.
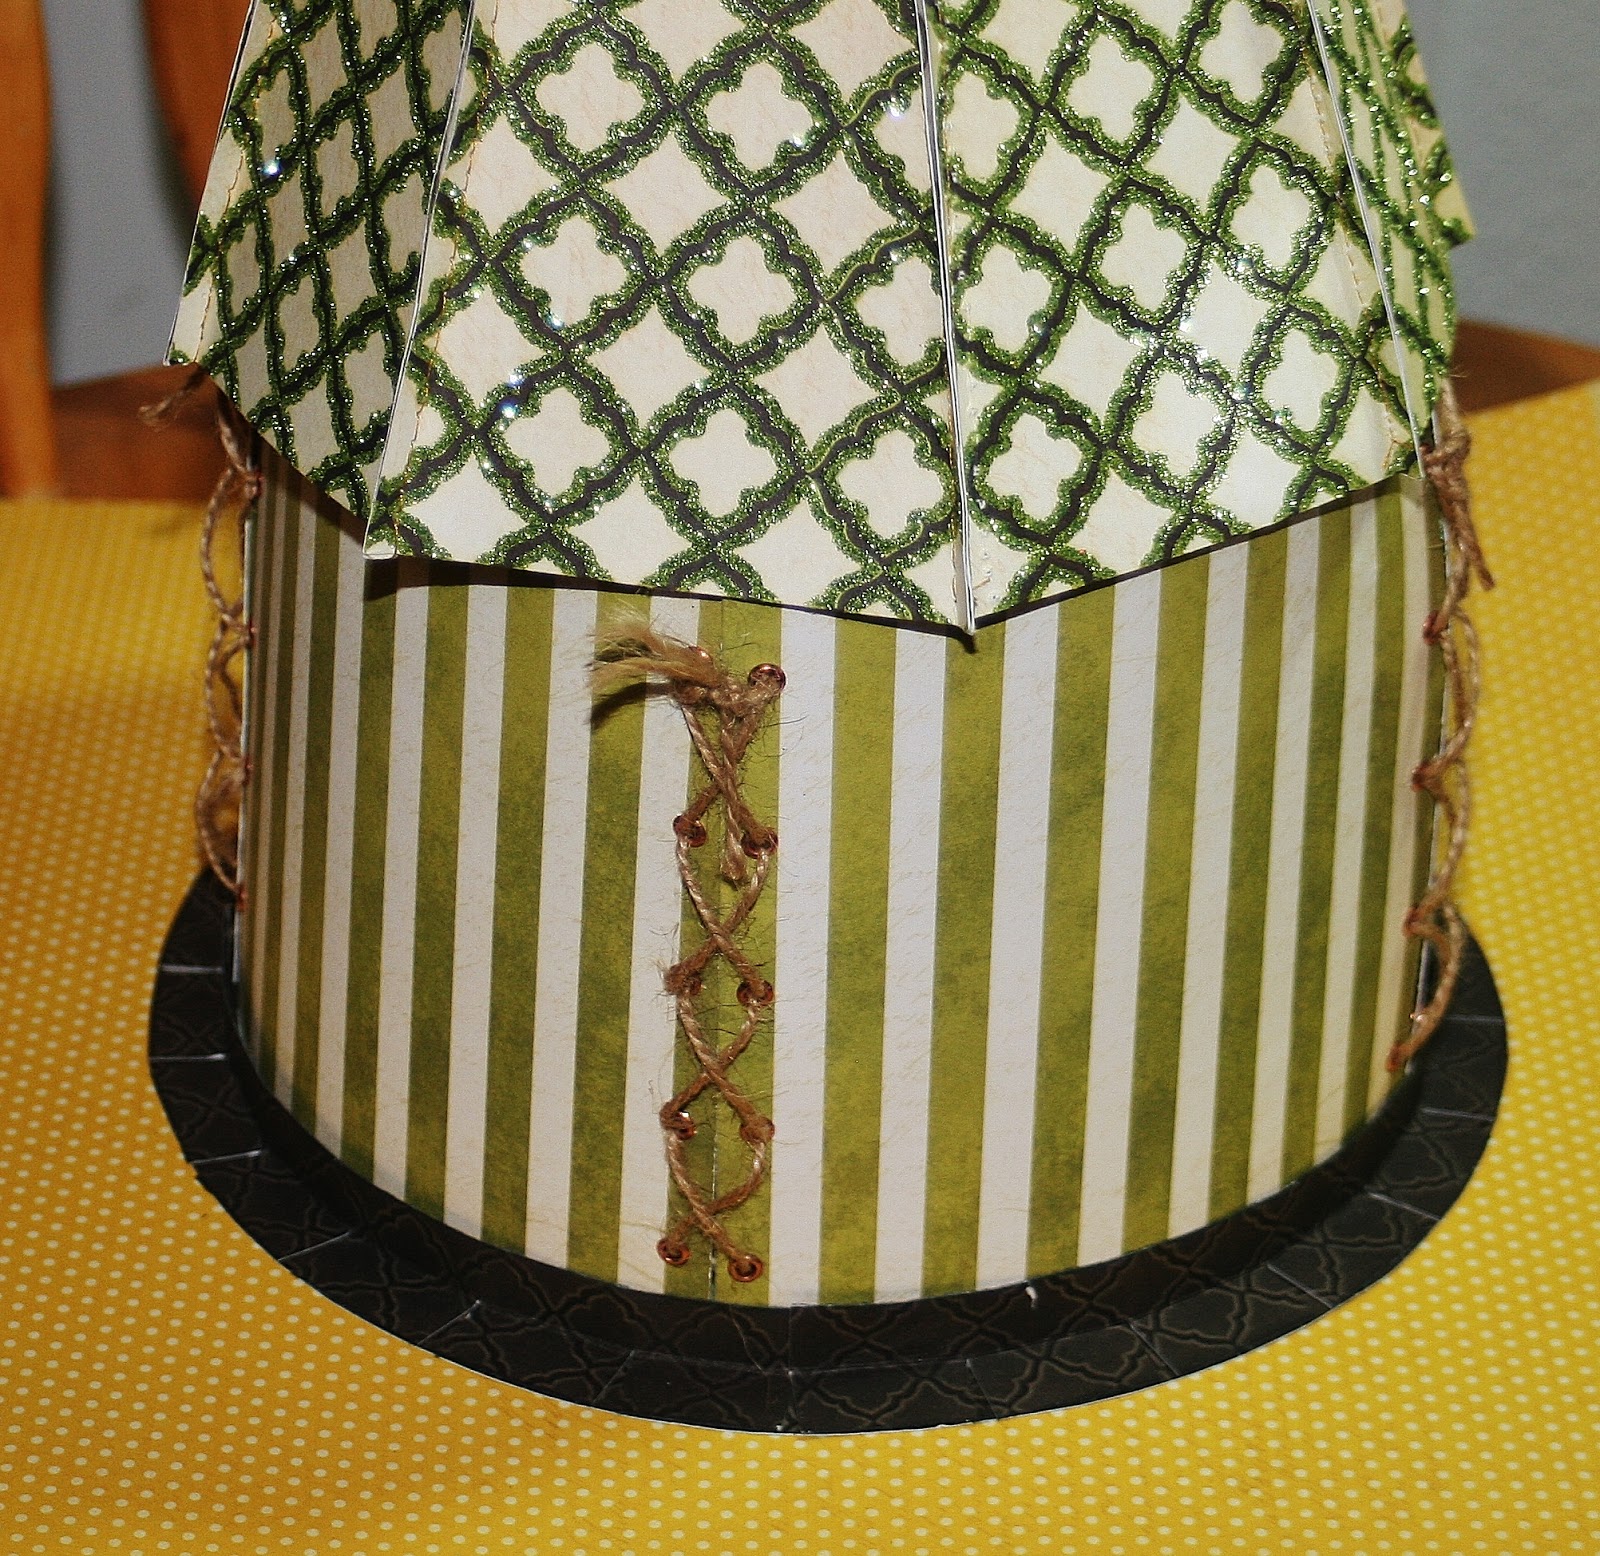
Step 6: Evenly space 5 eyelets on both 4.5" sides of 2 rectangles, and on one 4.5" side of the other 2 rectangles. Use twine to lace 4 rectangles together to form third tent tier.
Step 7: Place third tent tier in the narrow gap between the tent base and the black side strips. Top with first and second tent tiers (do NOT adhere). Decorate at will.
Step 8: Cut multiple 7.5 inch circles for Mini album, using ribbon to connect instead of rings. Store album in lowest tent tier.
....and that's all folks!!!

Scrap On!

~charity hotrum~