Monday, March 18, 2019

Dreamy Fantasy Collection By Calambour

Calambour's new Fantasy Collection scrapbook papers are simply dreamy! This castle galaxy pattern seems made for these photos of my girls. But no surprise there, the photos were taken at Conegliano castle in Italy. 
~ Lovely ~
 To add to the charm of the layout I fussy cut floral sprays from Calambour's Nomad collection. Prima chipboard, Pink Paislee rub-ons, and Studio Calico wood shapes embellish the photos.
Underneath it all a layer of Calambour Plaster Effect Mortar adds texture. The grainy look echos the castle walls. For this application I used an Aladdin's Screen stencil by Kite.
One last close up of the page highlights the scattering of sequins. It also shows the bright pops of striped yellow Hot Air Balloons. I just love all the uses I have found for my Pink and Main dies. 

Craft On
~charity hotrum~


Monday, March 11, 2019

Cats and Art Paintbrush Holder

Today's tutorial is a project that illustrates the lifeblood of our household...Cats and Art. Painting, drawing, sewing, scrapbooking, it all happens with a cat close by. One of my favorite photos is of my second oldest painting while a cat sleeps in her lap. I mean, if it doesn’t have cat hair in it did it even happen?
When it came to decorating a canvas paintbrush holder for my Lori, cats paws were a given. Deciding on the color scheme was MUCH harder. TatteredAngels High Impact Paint comes in 29 colors. How to choose? Who to send home without screen time? I gave up and used them all. I placed them in rainbow order from red to violet with the metallics between sets.
With the amount of colors I planned on using, the stamp would need cleaned, and cleaned well between each impression. The quickest way to do that is a wet wipe. Disinfectant wipes are harsh on acrylic and rubber so I used wipes made for skin. I did rinse the stamp with running water every 6 to 7 impressions and anytime I got too much paint on it.
Dab paint onto stamp, rather than brushing it on. Add a bit of color to the impression if the image doesn’t turn out clear.
The paw prints were super cute, but that was just the start. My daughter compared the shades of paint displayed on the canvas and chose Navy and Turquoise as her favorites.
I used 7gypsies Architextures Tall Base Swirls as a mask in the corners of the canvas holder. I trimmed them to fit and painted over them with Tattered Angels HighImpact Paint-Navy.
After using the Architextures I rinsed them and placed them back on the film. They weren’t completely free of navy paint, but they were definitely reusable.
I dabbed turquoise paint onto letter stamps and centered her name on the holder. Paw prints in the same color went on either side. Flourish bits I had cut off the corner pieces I placed under her name as a mask and painted over with turquoise paint.
Finally I punched a cat shape from cardstock and used the negative as a stencil with Navy paint. There was a lot of paint on that canvas paintbrush holder so I laid it flat to dry for a couple days.
When the project was finished the cats gave it a thorough inspection. Big Eyes decided it was acceptable and opted for a nap. If you don’t have a cat to approve your projects send them on over...he doesn’t charge for his services. :)
Stop by my Instagram for more crafty inspiration.
Scrap On!
~Charity Hotrum~

Monday, March 4, 2019

Pink and Main Paper Cactus Plant

How about a No Water/ No Kill paper cactus plant? This tutorial uses Pink and Main hot air balloon dies to make a garden for a plant lover with out a green thumb. Follow the tutorial below to assemble your own Paper Cactus Plant.
 All of my cacti are made using a set of concentric hot air balloon cutting dies from Pink and Main. After cutting out a variety of green, blue, and yellow balloons, I arranged and grouped them until they resembled cactus plants.
 The Prickly Pear Cactus assembles from the top down.
Adhere two small balloons, color side out.
Adhere small balloons to edge of medium balloon.
Top with a second medium balloon, color side out.
Use a white gel pen to add prickles.
 When your prickly pear is the right height cut a slit in the stem.
Adhere two more large balloons, color side out.
Cut a slit from the top of the balloon down to the center. 
Join slits to assemble the base of the cactus.
The Barrel Cactus is made by adhering two sets of small balloons, color side out.
Cut a slit in one pair from the top down and in the second from the stem up as shown. Remove stem of balloons with stem slit. Slide balloons together. 
 To make the main body of the barrel cactus cut four large balloons.
Trim off the sides so the balloon resembles an oblong.
Adhere small, assembled balloons to edge of oblong.
Top with a second oblong, color side out. Cut a slit from the stem up toward the center.
Adhere another set of small balloons and oblongs and cut a slit from the top down to the center.
Slide slits together, adjust as necessary.
 The Spiral Cactus is made from 8 large balloons.
Fold each balloon in half, length wise.
Adhere the right half of one balloon to the left half of another balloon.
Repeat this process till all 8 balloons are joined.
 The container is cut from printed cardboard.
I used the entire sheet of cardboard so had to measure and cut carefully. The photo below shows the details. Blue lines are cut through with a craft knife.
Cardboard is made of three layers. The orange lines of each piece are cut through the printed side and middle layer, but the back piece is left intact as shown in the second square below. This process leaves flaps of heavy paper that can be glued onto the adjoining piece to connect the sides. The bottom of the flower pot is the rectangle piece with 1" flaps and 4" center section. To cover all my scribbles I cut strips of the brown paper and glued them along the inside, top of the flower pot.
 The soil is basically a shelf of cardboard, covered with brown cardstock. The trick is to be certain the bottom and three sides of the pot are solid before adding the shelf. The shelf is held in place by the sloping sides of the pot. They don't allow the shelf to slide down.
Use the remaining piece of  4" x 6" cardboard for the shelf.
Make 1/4" flaps on either end so that the solid central piece is 4"x 5.5".
Cut a piece of brown cardstock 7.5" by 5.5". Score a 1" flap at each end of the brown cardstock. Adhere the cardboard shelf to the back of the brown cardstock, placing the flaps together.
With a craft knife, cut an X in the shelf where each plant will be placed.
Adhere the color side of the flaps to the flower pot sides, positioning shelf approximately 1/2" from the top.
Add cactus plants. Glue remaining side to flower pot. A bamboo skewer may be slid between the soil shelf and pot side to press the final flap onto the adjoining side.
This Cactus Container Garden looks great from any angle, but why stop with one? Plant yourself a garden of paper pretties that will never need watering and will ALWAYS brighten you day.

Craft On!

~Charity Hotrum~


Monday, February 25, 2019

Iridescent Peacock Feathers With Acrylic Paint

Iridescent Peacock Feathers are the feature of today's tutorial. Peacocks have been the subject for countless works of art due to their glorious plumage. Although I don't pretend to be a master painter, I can let you in on a little secret for how to get that signature peacock iridescence using a gold wash of acrylic paint.
I started with a wood model and an assortment of acrylics. I painted sample stripes of blues, greens, and browns on white cardstock. When those had dried I painted over them with stripes of metallic paint. The sheer metallics gave the colors an iridescent sheen and I had only to choose which color combinations I liked best.
For the body I choose Aqua and Blue, for the feet and beak, Brown. I painted the tail feathers in Blue, Brown, Green, Lime Green, and Antique Gold
 I carefully assembled the peacock and assigned colors to body parts. The original model planned for the eyes of the feathers to be punched out. I choose to leave them in but gave them an extra layer of paint to hold them there.
 Peacock wings, neck, and body alternate between light and dark blue. To get a similar look I painted the pieces with Aqua, let them dry, then splattered them with Blue. When those layers had dried I added a thin layer of Blue over it all.
 The base of the tail and back of the peacock I painted in Lime Green. I splattered the pieces with Brown to give the impression of multi colored feathers. A layer of Antique Gold added the iridescent look I had planned.
 The tail feathers took the longest to paint. I began with a layer of Aqua on the eye of the feathers and Lime Green on the rest. After a second layer of Aqua and Lime, I framed the eye with Brown and the outer edge of the feathers with Green. I added a dab of Blue to the center of the eye. The final layer of paint, Antique Gold, gives the tail feathers that iridescent gleam.
 I grew up with visits to Grandma's farm and her many types of fowl. Although the turkeys were my favorite, the peacocks were unmatched for beauty. I spent many long hours gathering peacock feathers from the pastures and woods. There is something so glorious about bringing in armfuls of blue and green feathers that flash gold in the sunlight.
This glorious peacock model was purchased off Amazon. The paints are from Canvas Corp Brands, and that amazing 3-D Taj Mahal was assembled by my daughter Lori.

Craft On

~charity~

Monday, February 11, 2019

Decoupage and Stencils Decorate a Dress Form

The perfect canvas for decoupage, stencils, paste, and metallic paint is a dress form. This beauty is 14" tall with a 5" vintage spool as a stand. My recent delivery of Calambour products give her an air of sophistication and charm.
My first step was to paint the form with Calambour decoupage glue. I ripped the rice paper into large strips and placed them on the wet glue. I applied another layer of glue over the paper. I only had one piece of the Victorian Cherub rice paper so I used Calambour Metallic Chocolate paint to patch over the uncovered areas.
 A strip of the Metallic Chocolate shows across the back as well as on the neck and shoulders. I was able to apply the paper to the front of the form evenly and fairly straight. The sections on the back didn't go on as well, but they give her a sashay so that's alright!
 Calambour 3D Glossy Gel in Ducat Gold is layered through stencils to create the fleur de lis on the dress forms left side and the paisleys on the right. Calambour Plaster Effect Mortar (paste) adds a series of leaves, dots, flourishes, flowers, and butterflies with the help of even more stencils.
 In place of a heart I have given this lady a blue butterfly. I stenciled on a butterfly with Plaster Effect Mortar then painted it with Calambour Metallic Tiffany paint. Given the curve, the placement of the butterfly took me a few tries. The resulting flutter of Tiffany Blue makes it all worth while!
My first dress form had a number of lessons for me. Some of those were about curves and letting go of perfection. The majority though, were about the fun of experimenting, taking chances, and creating for the fun of it!

Craft On!

~charity hotrum~

Friday, February 8, 2019

Valentines With Watercolors.

Today on the Canvas Corp Blog you will find a variety of watercolor Valentines card ideas. Be sure to stop by and see all the wonderful samples. Create your own and post it on the Tattered Angels Facebook page or on Instagram and tag us!
 Rather than a mixed media or layered paper approach, I went directly to painting. I've been practicing my drawing skills and am pleased with how this beauty turned out!
 The purple and green of her tail and hair are Tattered Angels Chalkboard Mist:Clover and Amethyst. The ocean is Tattered Angels Chalkboard Mist:Boogie Board and Blue Ribbon. The ocean didn't turn out quite like I had planned. Watch for more projects as I perfect my water technique!
The words are hand-lettered using a paint brush and Tattered Angels Glimmer Mist:Mardi Gras. To give the card a splash of valentine shine I matted it with gold foiled paper from Rinea.
Supplies:
Tattered Angels Chalkboard - Clover, Amethyst, Boogie Board and Blue Ribbon
Tattered Angels Glimmer Mist - MardiGras, Vintage Pink, Tattered Leather and Sand
Recollections - Cardstock
Rinea - Foiled Paper Gold

Craft On!

~charity hotrum~

Thursday, January 24, 2019

Florals and Feathers Wedding Layout

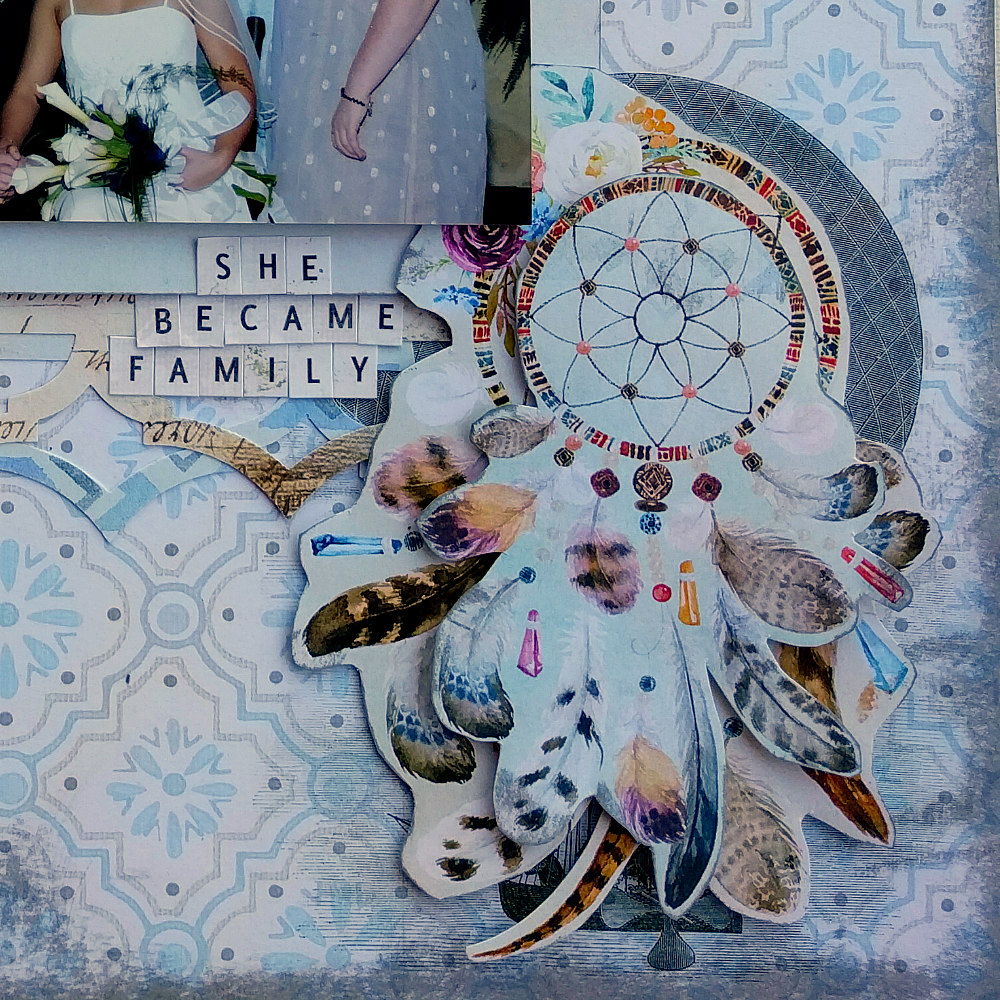
Nothing says wedding and new beginnings quite like florals and feathers. I have a wonderful new batch of papers from Calambour with plenty of images to fussy cut. The Nomad Collection has lovely desert hues that mesh perfectly with this old wedding photo. 
 My youngest brother was married while I was living in Italy. Despite being 5 months pregnant I wasn't about ready to miss the happy occasion. I flew half way round the world to be there. 
 The floral spray in the upper corner is layered with fussy cut feathers from the Nomad Collection. The die-cut feathers are from Calambour's Travel Collection. I just love papers with vintage script!
The dream catchers in the lower corner are variations of the same image. I fussy cut each one and stacked them. They are adhered over a vintage hot-air-balloon printed on the base paper, also from the Travel Collection.

Supplies:
Paper:Calambour
Cutting Dies:Amazon
Punch:EKSuccess
Ink:Close To My Heart
Alpha:BoBunny
Tiny Type:Authentique
Craft On

~charity hotrum~