Showing posts with label twine. Show all posts

Friday, June 15, 2018

How To Create Drama With Only Two Colors

Today's project is a clean and simple layout that creates drama with only two colors. I started with a 12x12 of black cardstock and added depth and interest with stamps and heat embossing. Only the Peachy Cheap wood shapes of clouds and gears relieve the monochrome color scheme.
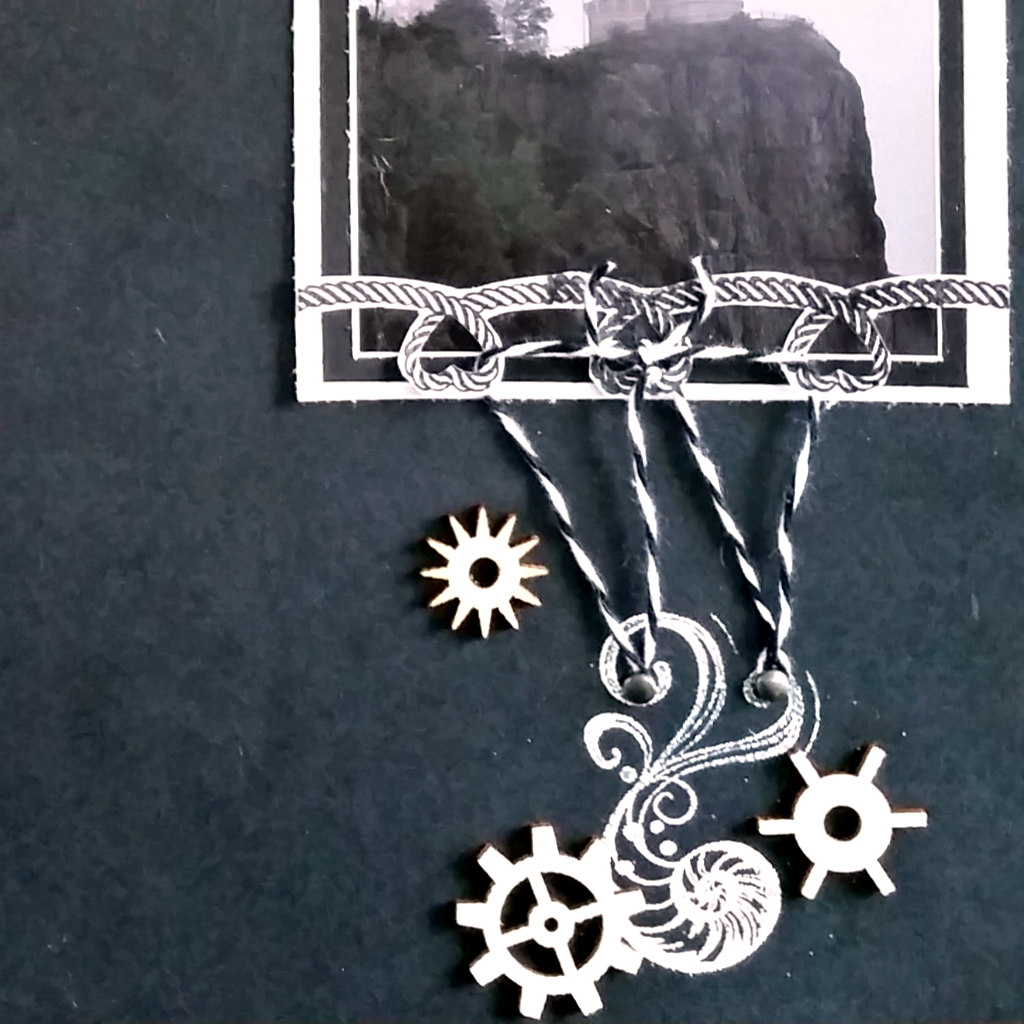
~ Split Rock Lighthouse ~
This month the color prompt from White With 1 is:
 This vacation photo of a mist shrouded lighthouse is perfect for the color scheme. Adding nautical themed stamps sets it off strikingly. The mermaid above and the nautilus below hold the photo aloft.
 The looped rope stamp is heat embossed with black ink onto white cardstock. I fussy cut the rope and used a die inside the loops. The looped rope boarder is glued over the matted photo. Twine strung through the loops is tied over a silver brad. 
 Wood gear shapes are scattered around the nautilus shell. Two small brads hold the twine below the photo.
 The ocean waves were stamped, heat embossed, then fussy cut. I popped them up with craft foam and layered them below the ship. A length of twine runs from the ship to the anchor below the waves. Wood cloud shapes from Peachy Cheap complete the scene.
Stop by the White...With 1 blog to see the design teams beautiful samples.

Scrap On!

~Charity Hotrum~

Wednesday, October 25, 2017

How To Make A Wreath That Will Be Perfect Year Round

Seasonal decor is SUCH a drag, it's time for a wreath that will be perfect year round. This simple black and white wreathe can be decorated for any season. Wander through the many choices of Printed Fabric Panels in the Canvas Corp shop. Choose your favorite then cut,color, and hang. Up-date your look with snap of your fingers and a twist of TWINE!
~ All Seasons Wreath ~
Directions:
 Step 1: Cut images from your favorite Fabric Panel leaving at least a 1/4" edge. Trace it onto fabric adhesive, cut out shape. Follow package directions for ironing adhesive to fabric. Trim images closely to reveal shape and remove strings. Color with permanent markers.
 Step 2: Divide wreath form into 1" quadrants. Cut 4 sheets of  12x12 cardstock in half. Roll into a cone lengthwise.
Step 3: Use a stapler to secure the large end. Use a brad or hot glue to secure the small end. 
 Step 4: Add paper cones to the wreath form working in pairs and dividing the form in half with each set of cones. I used hot glue for my wreath. Make a loop from a 28" piece of twine. Use a slip knot to attach it to the form.
 Step 5: Cut 3-4 12x12 cardstock sheets into 6x6 squares. Roll into cones and adhere to form. The shorter cones fill in the spaces between the larger cones so 2 smaller cones might not fit. Remember to work in pairs so the wreath stays balanced.
 Step 6: Cut a 6" circle of CARDSTOCK, and an 8" circle of a contrasting color. Cut complimentary strips of colored cardstock to frame the title. The title should be 1" smaller on all sides than the patterned piece and 1/2" smaller on all sides than the solid piece.
 Step 7: Attach the circles together and to the wreath. The circles will cover the center snarl and add a splash of color.
 Step 8: Adhere title and layers of cardstock together. Cut a piece of twine 8" long and tie a knot at the end. Punch a hole in upper corner of the cardstock frame. Pull twine thru the layers of paper, leaving the knot in the front.
 Step 9: Loop the twine around one of the paper cones, lace the twine through the back of the lower corner of the cardstock frame. Tie a knot in the front. Repeat for other end of cardstock frame.
 Step 10: Cut a 35" piece of twine. Tie a loop at each end of the twine. Slip loop over opposite paper cones. Use clothes pins to hang prepared images from the Fabric Panel onto the twine.
 Use a paperclip or brad to hold the twine in place if the weight of the images makes it slide. Choose a new Fabric Panel for every season, celebration, or color scheme. Iron, cut, and decorate as often as you'd like!
Supplies:
Paper:Canvas Corp, Craft Smith
Fabric Panel, Twine, Clothes Pins:Canvas Corp
Permanent Marker:Sharpie
6" Foam Wreath Form:Beter Homes and Gardens
Heat Activated Fabric Adhesive:Therm-O-Web

Craft On!

~charity~

Wednesday, October 11, 2017

How To Make a Fantastic Canvas with Brilliant Colors

In celebration of Mexican culture and childhood memories here is a how-to for a fantastic canvas with brilliant colors. During my teen years I lived in Texas. My family made various trips over the border and was invited to some amazing fiestas. During that time I was introduced to The Day of The Dead, a day to celebrate family members and friends that have passed on. It is a beautiful celebration of life and love. One symbol of that day is the sugar skull.
~ A Day To Remember ~
 I recently picked up a pack of stencils because of its fabulous skull and crossbones. Included was a sugar skull template. The idea for this wall decor was sparked!
 I applied a bit of Modeling Paste to this canvas with stencils. Then I was ready for COLOR! I spritzed on bright ink sprays and added metallic paint around the edge. Finally I decorated the skull with dots of glitter glue.
The Sugar Skull represents a very important day, so I needed a title to reflect that. I started with a strip of Rinea Foiled Paper in Glossy Violet. After decorating with flourish and heart stamps using Rinea Ghost Ink I was ready for words.
The letters are die-cut from Ebony Starstruck Rinea Foiled Paper. I punched the corners with a decorative punch and laced it to the canvas with twine.
Supplies:
Modeling Paste:Liquitex
Spray Ink:Ranger, Heidi Swapp
Alpha Die and Glitter Glue:Ranger
Acrylic Paint:Deco Art
Foiled Paper and Ghost Ink:Rinea
Stamps:Inkadinkado
Twine:Two Berry Creative
Corner Punch:Kreaxions

Scrap On!

~charity~

Thursday, July 13, 2017

How To Make An Absolutely Beautiful Gift Box

Here's how to make an absolutely beautiful gift box from Rinea Foiled Paper. The design mimics raindrop optical illusions. It is a bit tricky to line up the circles, but more than worth the effort. 
~ Illusions Gift Box ~
 The sides of this box are a series of fluted concentric rings, die cut from the Jewels Variety Pack of Rinea Foiled Paper. I glued them to Kraft paper in the two patterns below.
 Beginning with the open centered square, I cut a small circle from the side. I cut a corresponding circle from the foil centered square. I exchanged the circles between the two squares.
To complete the gift box I made 3 pair of squares with concentric fluted circles. The first pair had nothing removed. The second pair had one small circle exchanged. The third pair had two small circles exchanged.
 To enhance the party flair of the gift box I punched balloons from an alternate color of Rinea Foiled Paper from the Jewels Variety Pack. I glued Twine to the corner of the box. Over that I added the balloons so that they spread on either side of the corner.
 Here is a view of the Back of the box showing the inverse color schemes.
  
It is never too early to begin making Teacher Appreciation gifts. With an optical illusion theme this box will be just right for either a male or female recipient. My perfectionist 6th grader will be thrilled to hand over this lavish little number to his adored teacher. 
Supplies:
Foiled Paper: Rinea
Cardstock: Recollections
Ribbon: May Arts
Twine: Jillibean Soup
Best Glue Ever: ScraPerfect 

Scrap On!

~charity~

Thursday, September 15, 2016

Fall Banner

 Fall in my area starts with the return of rain and the greening up of the grass and bushes as things recover from fire season. The nights become colder and the leaves begin to change;
 Fall puts on a color show! Today I have a banner to celebrate this season.
For this banner I used a mix of the Robin's Nest fall and winter papers.
For a little extra fun I made paper tassels with the scraps.
I cut the letters from Leaf Glitter Cardstock and Orange Bones Cardstock with the WeRMrk Alphabet Punch Board.
The base of the banner is 4x6 pieces of  Black and White Pine Tree Cardstock with the lower corners rounded.
The top of each banner piece is reinforced with washi tape. Before attaching the letter I punched all around the banner's edge. I added laser cut Chipboard Leaves and Flourishes by Gina's Designs to each banner piece.
The banner pieces are strung on Natural Twine with a few added paper tassels.
Paper Tassels
Tassels are all the rage and with a few snips and a brad or two you can have an assortment to decorate your latest project in corresponding colors and papers.
For each tassel I used 10 strips of paper, cut to 6x.25 inches; a small brad; and 10 inches of twine. Two are from the Green Elephant Glitter Cardstock and the others are cut from the Leaf Glitter Cardstock.
I assembled the colors into two starbursts, pierced them at the center, and used a glue stick for adhesive.
When the paper strips were dry I stacked them and added a brad through the center.
I curved the strips down from the center brad and tied the twine around the upper portion. I trimmed the loose edges of the twine and curled the tassel strips up-ward. I threaded twine through the top strip of paper for hanging.

Supplies:

Paper,  Natural Twine:The Robin's Nest
Chipboard:Gina's Designs
Washi Tape:Love My Tapes
Punch #916:Kreaxions
Brad:Spare Parts
Alphabet Punch Board:We R Memory Keepers

Scrap On!

~charity~

Thursday, September 1, 2016

Potion Bottles

Today's project is a step-by-step tutorial for fantasy themed altered bottles. These particular bottles are from Vanilla and trial size Olive Oil.
~ Potion Bottles ~
I am thrilled to say that with the exception of the bottles, twine, and tiny type, ALL of the supplies to decorate these bottles are available at The Robin's Nest Store!!!
Step 1: Clean bottles and let dry thoroughly. The dish washer works great for removing labels, but be sure to remove the paper from the filter!!!
Step 2: Cut feathers from Blue Glitter Chipboard. Paint lower two thirds of feathers white, leave to dry.
 Step 3: Apply Doily Die Cut to bottle using extra strength adhesive tape. Using the same method apply Orange Crush Card to bottle. Add lettering.
Step 4: Add assorted Dew Drops to doily and card.
Step 5: Wrap Natural Twine around neck of bottle, glue Natural Seashells to ends. Wrap twine around bottle at center of card, tie in back.
I love medieval themed items and often use them as year-round decor. If that is not your style then group these bottles in strategic areas for Halloween!

Supplies:

Decorative Supplies:The Robin's Nest
Feather Dies:Lawn Fawn
Tiny Type:Making Memories
Acrylic Paint:Delta Creative

Scrap On!

~charity~

Wednesday, August 17, 2016

All The Best

Today's project is a Mason Jar card.
~ Wishing You All The Best ~
To make this card I stamped the mason jar twice. 
Once on the card front and a second time, on green paper.
With a bit of work with my craft knife I had second dimension for my card. I used dimensional adhesive to pop it up. I over stamped when I was adding the dandelion wishes so I tied on a twine bow and called it good.

Supplies:
Paper:Craftsmith
Stamps:CTMH, Little Yellow Bicycle
Alpha Stamps:Mason Row Pegs
Ink:ColorBox
Glitter Glue:Ranger
Twine:stash
Border Punch:Kreaxions #902

Scrap On!

~charity~