Showing posts with label single photo feature. Show all posts

Sunday, September 23, 2018

How To Make An Epic Layout With A Stencil

The background for this epic layout is made with a stencil and layers of Glimmer Glam. Shiny foiled paper makes the photo mat pop and multiple die-cuts add to the layers. The boy wears his mask like he is proud to be a
~ Fossil Face ~
 
The base of the layout is covered with a small print of circles, cubes, and stars. The central 8 inches of the paper is enhanced with sheer, sparkle paint, dabbed thru a stencil. To keep the colors clear I had to apply each color then wash and dry the stencil.
 The photo mat is a rectangle of patterned paper topped with a rectangle of foiled paper. Best Glue Ever holds the foiled paper without leaving wet marks or wrinkles.
 The die-cut arrows and gears are applied with thin strips or dots of Best Glue Ever.
 An thin outline of Best Glue Ever holds the foil lined mandala strips to the layout.
 Another layer of die-cuts, these with minuscule gluing surfaces, are added to the layout. The No-Clog Writing Cap places the glue exactly where it is needed.
 A thin strip of Best Glue Ever attaches a strip of craft foam to the border stickers.
 White, fabric thickers are painted with the same blue, glitter paint used with the stencil.
 Each alpha is dotted with Best Glue Ever then placed on the layout.
 From this angle you can see the dimension the craft foam gives the embellishments.
 Although the finished product covers nearly half of the stenciled background, the colored circles still enhance the layout and give the page depth.
Supplies:
Patterned Paper, Stickers:Photoplay
Foiled Paper:Rinea
Cutting Dies:Echo Park, Avery Elle
Stencil:Memory Box
Alpha:American Crafts
Glitter Paint:Tattered Angels

Craft On!

~charity~

Monday, August 27, 2018

How To Layer Llamas for a Stunning Page

Today's layout is a shining example of how to layer llamas for a stunning page. Paprika paper collection from Photoplay Paper is bright and cheery and scattered with merry llamas. With a bit of texture and a few added die-cuts the whole layout has a happy feel.
~ Shine ~
 I started the background texture for this layout with Rub-ons, Calambour 3D Gel, Nuvo Embellishment Mousse, and tissue paper images.
 A couple layers of gloss medium and lots of drying time secured the edges of the tissue paper.
 The photo mat started with patterned paper and finished up with a flourish of product packaging. I even made a few clips with ribbon ends.
 I left the edges of the photo mat loose, only adding glue to the center so that I had room to scatter stickers and paper shapes around the edges.
The orange blossoms and tissue paper leaves at the edge of the photo are separated with stacks of craft foam.
The laser cut chipboard was rubbed with Nuvo Embellishment Mousse then layered over the orange blossoms with a few drops of Best Glue Ever.
A variety of die-cut doilies are stacked at the corners of the photo mat and interspersed with the blossoms. 
The lacy edges of the doilies are echoed in the white outlines of the flourish on the photo mat base. The llamas add a touch of whimsy while the triangles of mandala set this layout apart. The lime lace and matching chipboard and the final touch of spice.
Supplies:
Cardstock:Crafters Warehouse, Craftsmith
Patterned Paper, Stickers, Alpha:Photoplay Paper
Product Packaging, Rub Ons:Ranger
Ribbon:Vintage, Thrifted
3D Gel and Tissue Paper Images:Calambour
Embellishment Mousse:Tonic Studios
Stencil:Momenta
Gloss Medium:Tattered Angels
Paper Clips:7gypsies
Brad:EchoPark
Doily Dies:Peachy Cheap, Crafter's Companion
Doily Punch:Martha Stewart

Craft On!

~charity~

Friday, June 15, 2018

How To Create Drama With Only Two Colors

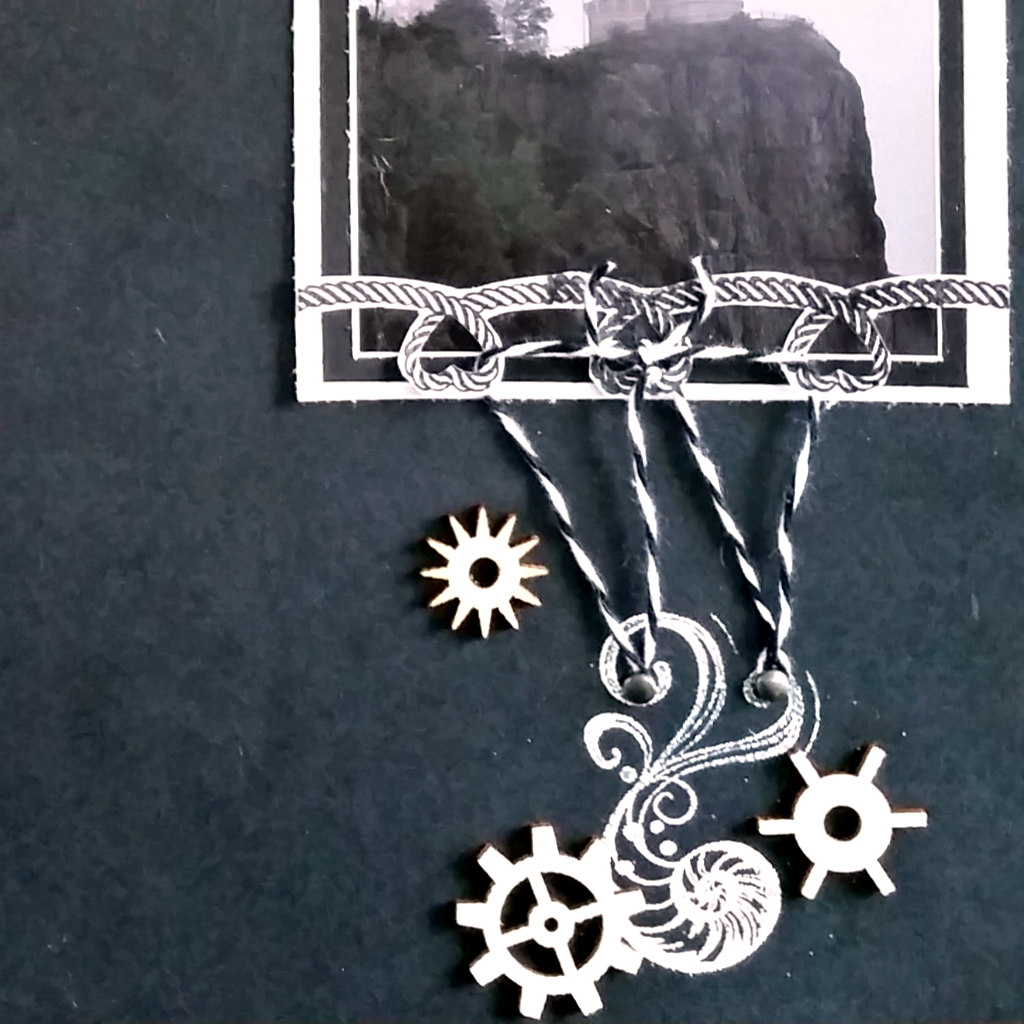
Today's project is a clean and simple layout that creates drama with only two colors. I started with a 12x12 of black cardstock and added depth and interest with stamps and heat embossing. Only the Peachy Cheap wood shapes of clouds and gears relieve the monochrome color scheme.
~ Split Rock Lighthouse ~
This month the color prompt from White With 1 is:
 This vacation photo of a mist shrouded lighthouse is perfect for the color scheme. Adding nautical themed stamps sets it off strikingly. The mermaid above and the nautilus below hold the photo aloft.
 The looped rope stamp is heat embossed with black ink onto white cardstock. I fussy cut the rope and used a die inside the loops. The looped rope boarder is glued over the matted photo. Twine strung through the loops is tied over a silver brad. 
 Wood gear shapes are scattered around the nautilus shell. Two small brads hold the twine below the photo.
 The ocean waves were stamped, heat embossed, then fussy cut. I popped them up with craft foam and layered them below the ship. A length of twine runs from the ship to the anchor below the waves. Wood cloud shapes from Peachy Cheap complete the scene.
Stop by the White...With 1 blog to see the design teams beautiful samples.

Scrap On!

~Charity Hotrum~

Wednesday, June 13, 2018

How To Make a Layout With Foiled Paper Outlines

Today's project is a bright and sassy floral layout with emerald foiled paper outlines. This photo of my daughter in pink needed surroundings as ready to make a statement as she is. I used the Rooftop Garden collection from Craft Smith for the patterned papers of this layout.
~ You Got This ~
 I fussy cut the flower strips and glued them onto strips of emerald Rinea foiled paper. I fussy cut the outline to help the flowers standout against the pink background. Next I layered the flowers with a wide striped paper.
 The title is fussy cut from the Rooftop Garden collection journal cards. Strands of green gems lay across the title words and individual gems decorate the bicycle hubs. The aqua die-cut paper is Recollections. The fuchsia strip of Rinea foiled paper is detailed with a Martha Stewart border punch.
The bicycle is cut with a Peachy Cheap spring die from aqua grid paper. It settles nicely against the bicycle print photo mat.
The flowers here are all by Recollections in a variety of green shades.  The wood leaves and flowers are from Peachy Cheap. 

Scrap On!

~Charity Hotrum~

Wednesday, May 23, 2018

How To Make An Industrial Grunge Layout


The Tattered Walls kit from 123 Scrap With Me has an Industrial Grunge edge to it, perfect for Mixed Media layouts. The combination of Nuvo Embellishment Mousse and TCW Stencil: Screen Print are perfect layered over the Blue Fern Studios papers. Stop by 123 Scrap With Me for a look at the kit. It begins shipping May 24th!

~ Challenge The World ~

The photo featured on this layout is my oldest daughter. She was going through a Jane Austen phase and needed a regency style gown to fulfill all her dreams. I agreed to assist with the sewing project on the condition I was permitted a photo shoot. An agreement was quickly made!
The base design for the layout is vertical strips of Blue Fern Studios papers. I used the Screen Print stencil and Lilac Lavender Nuvo Mousse on either edge of the large central strip. Using a binder punch I created a stencil with a piece of cardstock. I used it to create a line of circles from Coastal Surf Nuvo Mousse on the left side and Toasted Almond on the right.
The Tattered Walls kit includes an Architextures Junque Pack:Library. I cut the “door knob” vertically and used circle and hexagon cutting dies on the “tooled leather” piece. Doodling, a scattering of Ideaology phrases, and a twist of ribbon finish the photo frame.
Layering to the right of the photo includes a piece of Kaisercraft frame and more scattered phrases. I edged a scrap of BFS “The Library” with a postcard cut and inked. I slipped the dragonfly shape on the stencil under the edge of the frame. I used my finger tip to apply a thick layer of Nuvo Mousse in Toasted Almond.
I repeated the dragonfly and mousse process at the photos upper edge. The stencil retained some of the product so I patted it randomly across the layout. I machine stitched a line to the left of the photo, and added the drop light from the Architextures Junque Pack.
These are the items I used that are not found in the kit:thread, gel writer, circle and hexagon die, binder punch, grey cardstock doily.

Here is a look at the kit I received.
These three Nuvo Embellishment Mousse are my choice of kit Add-ons:
Coastal Surf
Citrus Green
Lilac Lavender


Scrap On!

~Charity Hotrum~


Tuesday, May 1, 2018

Childhood Hero Layout, Stitched and Water Colored


Today’s project is a stitched, water colored, layout featuring my daughters childhood hero. I used 3 different patterns from Graphic 45’s Fairie Dust, majoring on the B sides. Those tiny prints appeal to me and make layering a snap.

~ Childhood Hero ~
The signature page for Fairie Dust has a lovely frame with images outlined along the edges. I knew right away that I wanted to add watercolors to it. The color intensity is muted by the background of blue and green, but over all I like the way the fairies are highlighted.
I fussy cut violets but had to back them with vellum doilies. I didn’t want them disappearing into the purple of the central strip.
The frame ended up with a few chunks bitten right out of it. To camouflaged the small gaps by inking the inner edge of the frame. The large bits were covered with fussy cut fairies from Tiny Toadstools.
I folded down the corners of the photo mat and stitched them with gold braid. I also stitched the purple central strip to grey cardstock. I tried a fancy stitch first, but it didn’t really show up so I went over it with a zigzag.
This layout is a Fairie Garden in response to a prompt from Inspired By:
Supplies:
Cardstock:Crafters Warehouse
Patterned Paper:Graphic 45
Design Vellum:Hobby Lobby
Flowers:Prima, Recollections
Alpha, Stickers:Studio Calico
Tiny Type:My Minds Eye
Cutting Die:Crafters Companion
Ink:Close To My Heart

Scrap On!
~Charity Hotrum~

Wednesday, April 25, 2018

Handmade Flowers and Foiled Paper Diecuts

I spent the weekend playing with Fairie Dust, handmade flowers, and foiled paper diecuts! I love this Graphic 45 paper pack so much I don't want to waste a even a SCRAP! I made the layout below with less than two sheets of patterned paper, one and a half sheets of cardstock, and assorted foiled paper scraps.
~ Believe ~
The first trick is to use front and back of the same patterned sheet. That plaid is the reverse of the sweet pea and violet paper. The second trick is to cut the chosen patterned paper into 3 strips of verying width and cut about an inch off the top of two of those strips.
Mount the shorter strips on either edge of a cardstock sheet, about 1/2 inch in from the edge.
The longer strip should be turned over and mounted over the gap on the cardstock. The longer strip will overlap each side by half an inch. I also added a 1" strip of patterned paper down the length of the longer strip for contrast and layers. You can see the thin strip of blue peeking out, below.
I used chipboard and wood shapes as well as an assortment of die cuts for clusters between the layers. Rinea's Marigold, Violet, and Lavender foiled papers are the exact hues to compliment the Fairie Dust collection.
The multi-layered flowers are cut from 2x12" strips of patterned paper from the Fairie Dust collection. After die-cutting the flowers I inked the edges, rolled the petals, stacked them with Best Glue Ever and added a gem for the center.
The plaid paper was a little too busy so I added white doilies for a bit of definition. Scattered chipboard words and a title made from one of the stickers finished off this layout. I love that the orange stuffie in the photo is the exact shade of the Marigold Foiled Paper and the Sweet Peas.
I loosely followed the sketch below by Laura Whitaker.

Supplies:

Cardstock:Crafter'sWarehouse
Patterned Paper, Stickers:Graphic 45
Foiled Paper:Rinea
Dies:Tim Holtz, Crafter's Companion, Spellbinders, Amazon
Ink:Close To My Heart
Wood Shapes:Peachy Cheap
Gems:Michaels
Glitter Glue:Ranger

Scrap On!

~Charity Hotrum~