Friday, August 31, 2012

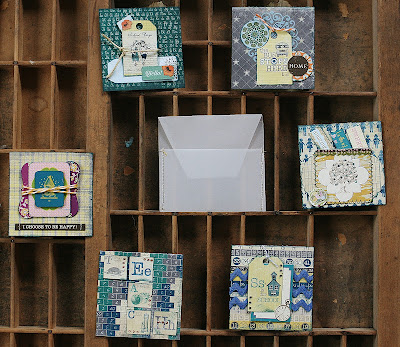
ATC:MCM96

One of the easiest ways to put a classy ATC together is to use a card sketch. These three ATC's illustrate a Kristy Lee's sketch for Scrapbook Steals.
 
Supplies:
Paper:Websters Pages
Punch:EK Success
Word Stickers:Authentique
Twine:The Twinery
Trim:Stash
Ink:CTMH
Sketch:
 
~charity~

Thursday, August 30, 2012

ATCs:Kites and Bicycles

I have really come to enjoy making ATCs. The tiny space makes the design so much more challenging. This particular set of ATCs is for a swap with my Craft Enabler peeps. They are supposed to be fall themed, but I already had these planned out for the summer swap we didn't get to. We'll just have to pretend kites and bicycles are fall-ish!
Front and back of my ATCs are always a bit difficult to distinguish. Most people make batches of ATCs with all the same design. Since I do double sided ATCs I have decided that the front of my ATCs will be the same and the backs will be where I let my immagination go.
I've settled on an alphabet card style, illustrated with stamping.
Although I do the backs of my ATCs with different designs, I try to stick with a theme.
This time that theme was friendship. These Authentique word stickers had just the right sentiments.
For the most part I use Webster's Pages 6x6 papers for my ATCs. They have miniature motifs and patterns that really stand out with fussy cutting.
Supplies:
Papers:Webster's Pages
Ink:CTMH and Color Box
Washi Tape:Up and Up
Dimensional Glitter and Pearlescents:Ranger
Gems:Recollections and CTMH
Punch:EK Success
Twine and Trim: stash
Stamps:Hampton Art and Unity
Word Stickers:Authentique
 
~charity~


Wednesday, August 29, 2012

Chandefleur

I have always regarded paper flowers as the cotton candy of paper crafting. A little goes a long way, especially when made by hand. That didn't stop me when I saw this fabulous cupcake stand at garage sale prices. It looked like the perfect starting point for a flower chandelier.
 As soon as I got it home I started contorting my paper into crazy shapes. After a great deal of punching, tearing, inking, misting, glitzing, and LOTS of hot glue I had gone through the entire MME 6x6 All Is Bright paper pad. Then I started with the gems, twine and beads. Several inky fingers later this is what it looks like:
24 different paper flowers fill this wire holder.
  16 were made with punches by EK Success, Punch Bunch, and The Paper Studio.
3 were made from long strips of paper, torn, misted, then wrapped like ribbon roses.
5 were frayed with an edge distresser.
The twine and gems are MME product, also from the All Is Bright collection.
The ink is Close To My Heart and the Stickles are by Ranger.
The acrylic prisms are from my stash.
Next time you see a sweet little wire structure think paper flowers and snap it up.
 
~charity~


Tuesday, August 28, 2012

Early Morning Chat

Since I have become involved with scrapbooking and sharing my creations on the internet I have made several precious friends. One lives another country and time zone away, but we are both early risers. I look forward to catching Sheryl on line and chatting thru Facebook. One morning after such a chat I snapped this picture of swallows on my roofline and sent it to my friend.
Practical Scrappers is featuring washi tape today. I am just in LOVE with this sticky, stuff!!!
For this layout I wrapped white cardstock with stripes of washi tape, then used my Cuttlebug Dies to cut various sized squares.
I fussy cut this flourish from patterned paper and layered it with pearls.
I stitched a double frame around the photo and added friend phrases. With a few more pearls, a bit of inking, and a title I called it good.
Supplies
Paper, stickers, tiny type, small alpha: Authentique
Washi Tape: Up and Up and Recollections
Pearls and Large Alpha: MME
Ink: CTMH

~charity~

Monday, August 27, 2012

You are my Sunshine

This layout is for the Monthly Song Lyrics Challenge at Paper Secrets. A childrens' song or song about children were the guidelines. The photo and song were a no brainer for me. My eldest loved to hear me sing "Sunshine" to her by the hour when she was little. We would change the words or jazz up the tune, but we always sang the chorus together.
~ You are my Sunshine ~
(Please click on the photo for a closer view)
I love the way this photo captures here sunshine personality. To enhance that happy feeling I painted a pair of Tim Holtz grunge board wings gold. After dusting them with lime green flocking powder I used my heating tool to help them dry quickly. This added a bit of a curve so they stand out nicely from the page.
Give your sunshine a hug today, and hum a few notes together.
Supplies:
Paper and Tiny Type:Authentique
Trim: Recollections, Petaloo, Stash
Grunge Board and Acrylic Paint:Ranger
Stamp, Ink, and Individual Gems:CTMH
Gem Flourish:Recollections
Hanging Gems:Jolee's
Alpha:Cosmo Cricket
Flocking:Recollections
Sketch:
 
~charity~


Friday, August 24, 2012

Teacher Notes


Every year, about two weeks before school starts the kids get restless and I begin to remember why I love it when school is in session. This year was no different, accept, that this time I am ready to thank each and every teacher for their random acts of kindess.
When I saw the Curiosity line by Authentique I new right away I wanted to make a batch of cards for the kids teachers. These sweet little notes sit in the kitchen by the lunch making supplies.
 Now I can grab a 3x3 card, slip it in an adorable vellum envelope and say, "Thanks, for taking such good care of my child today!"
Use It Tuesday is challenging us to use up our stash with school themed projects. I new my card idea was perfect for this challenge and had just the right stashed item to use:
My pile of Authentique die-cuts, tags, and jounaling spots!
Looks like I'll be making cards all year to make a dent in THAT pile. 
Supplies:
Paper, tags, die-cuts, journaling spots:Authentique
Stickles:Ranger
Twine and Trim:The Twinery, MME, and Stash
Shapes Scissors:Fiskars
Punch, Gems, Ink and Vellum:CTMH
Medallions:MLS
 
~charity~


My Boy is...

For this layout I wanted to go heavy on technique and used washi tape, inking, sewing, embossing, and a little tearing for the large mat under the photos. To get my photos to stand out against the multicolored background I matted them with cardboard. 
~ My Boy is...~
 
Sketch: Rochelle Spears for Paper Secrets
 
Supplies
Paper,Title Tag, Stickers, and Alpha: Echo Park
Brads: Basic Grey
Punch: The Paper Studio
Decorative Scissors: Fiskars
Enamel Accents: Ranger
Embossing Folder: Provo Craft
Ink: CTMH
 
~Charity~


Thursday, August 23, 2012

Meander

This is Echo Park month at Paper Secrets. They have 6 challenges this month with extra entries for using Echo Park products. I made this layout using a mixture of Echo Park's This & That and Family Man collections.
~ Meander ~
Supplies:
Paper and Stickers:Echo Park
Dimensional Enamel:Ranger
Punch and Ink:CTMH
Brads:Spare Parts
Alpha:MME
Sketch by Krisy Lee for Scrapbook Steals

~charity~

Wednesday, August 22, 2012

Too Early To Eat

One of my favorite features at Practical Scrappers is Frugal Finds. For this feature the team leads come up with a random household item and the DT turn it into art. This months Frugal Find is flatware. I went to dig in the silverware drawer for spare pieces and found these animal forks. Eureka!!!
 ~Too Early To Eat ~ 
To attach forks to a layout or card:
1) Grasp a large nail or screw with a pair of needle nose pliers.
2) Hold it into the flame of a gas burner until it very hot.
3) Press the point of the nail through the handle of the plastic fork.
4) Lay flatware on the layout and pierce holes in cardstock.
5) Lace twine through the holes in the fork and cardstock, tie into a bow.

Supplies:
Paper:Webster's Pages
Twine:The Twinery and MME
Ink:CTMH
Buttons:Stash
Alpha:Basic Grey

~charity~

Tuesday, August 21, 2012

Sweet is a boys love

There is something so special about a boys love for his Mom. It is a combination of snuggles and responsibility. This boy things he should be taking good care of me, but he runs to me for every hurt and sorrow. I hold these moments close because I know the day is coming when he will no longer need his "Ouchie's" kissed.
~ Sweet is a boys love ~
My inspiration for this layout came from Keren Tamir's (blog post here) recent layout for Creative Scrapper's. I am so intrigued by the chunky layers and industrial look of the distressing.
Although I knew how I wanted this layout to look I didn't have time for the layers of mist and ink such a look takes. Instead I turned to my stash of Rub-Ons. I layered 7-Gypsies gears and clocks in the corners of my paper and overlayed that with a large, gold rub-on by Glitz. To keep the rub-ons from peeling off my page I covered them with a layer of Glue Stick. After that had dried I heavily inked the edges of the layout by directly applying the ink pad to the paper.
For a little something extra I layered washi tape and rub-ons with Film Strip Transparency and MME brads. Don't you know it, while I was inking my page I left a finger print. I quickly added a few more and embellished them with Dimensional Enamel. The purple and black medallions are Glitz rub-ons that I fussy cut from the sheet of images. I rubbed the backs with Glue Stick, and adhered them with hot glue and wooden buttons in place of dimensional adhesive. 
Sketch by Kristy Lee for Scrapbook Steals
Supplies:
Papers:Lucky 7 Factory
Rub-Ons:7 Gypsies, Daisy D's, Glitz
Washi Tape:7 Gypsies and Recollections
Transparencies:GCD Studio and Idea-ology
Metal Flowers, Corners, and Ink:Close To My Heart
Alpha and Frames:American Crafts
Dimensional Enamel:Ranger
Tiny Type:Authentique
Hinge:Daisy D's
Brads:MME
Ribbon:Stash

~charity~

Monday, August 20, 2012

Bold Blooms: Paper Girls Challenge #14

Paper Girl Amber is challenging us to "Get Messy" this month. I choose Tattered Angel's Glimmer Mist as my messy medium. I pulled out all the stops and used 7 different colors on my Layout. The paper got TERRIBLY contorted because I forgot to mist and then press! Oh well...
Bold Blooms
Supplies:
Mist: Tattered Angels
Flowers: Prima and Petaloo
Buttons: Basic Grey
Twine: The Twinery
Paper: CTMH, Pink Paislee and Cosmo Cricket
Alpha: Girls Paperie

~charity~

Saturday, August 18, 2012

Rosy Glow

I am doing a series of blank pages for a family member. This type of scrapbooking
 has pros and cons.
Pros: I can use any color scheme or page orientation I want.
Cons: I usually get my inspiration from the photo's
 subject and color so I'm having to dig deep into a side of scrapping I don't normally use.
I love how the combination of striped papers and flowered background give this page the look of a flower stall. It seemed the bird and butterfly enhanced that theme.
Supplies:
Papers: Bo Bunny and MME
Die-Cut, Gems and Pearls: MME
Cage: Jolee's Stickers
Pins: Recollections
Flower: Petaloo
Punches: CTMH and EK Success

~charity~

Friday, August 17, 2012

Angel Eyes

I just love this photo of my daughter.
DH was setting up for a photo of her sister with the lilacs
 and Annalys decided to show us how it's done.
Her eyes are so striking and soulful!
~ Angel Eyes ~
To add to the drama of this layout I dry embossed my photo.
Check out my feature on Practical Scrapper's
for more tips on this super fun technique.
Supplies:
Ink: CTMH
Paper: DCWV
Punches: EK Success
Gems: Recollections
Alpha: American Crafts
Embossing Folder: Provo Craft
Black Diamond Stickles: Ranger

~charity~

Thursday, August 16, 2012

MCM 95: Thanks and Train

It seems I can't go anywhere without taking at least a few scrapping supplies along. On a recent trip to Grandma's I brought a basket of My Mind's Eye paper. I made these cards using a Kristy Lee card sketch for Scrapbook Steals.
For this card I hand cut the hexagons and flowers.
Accept for the Pink Paislee ribbon and Ranger ink
the supplies for this card are from My Mind's Eye.
For the second card I dug into MME's Lime Twist.
Twine and papers: MME
Punch: Stampin Up

~charity~

Wednesday, August 15, 2012

Holey Beach Rocks...Batman

Check out these fun rocks we picked up on the West Coast! Unfortunately they crumble easily. But I'm hoping the wire will hold them together for a little while.
The original plan was to wrap the holey pebbles with wire and give them as pendants. I started with 9 rocks but lost 4 in the process. These are the ones that didn't break during wiring.
~charity~

Tuesday, August 14, 2012

Memo Board: May Arts July Craft Challenge

When the sweet ribbon lady over at the May Arts blog offered silk ribbon for the July Craft Challenge I jumped on board with an olympic size leap. I suggested a Memo Board  with ribbon embroidery around the edges and received 2 yards each of 1/4 inch silk ribbon in white, pink, blue, and purple.
I picked this up from a friends garage sale for $2.
I removed the ribbon and buttons and started hunting for a fabric the right size to cover this board.
I settled on a piece of natural colored burlap. I measured the places for the ribbon and marked them on my fabric, then drew out my design.
I love the way roses look sprawling over an old fence. To get that look I sewed my fence on the fabric with the white ribbon and then used pink silk ribbon and grey seed beeds for the roses.
The yellow flowers are made from chevron stripe May Arts ribbon from a previous project as well as beads from my abondoned jewelery box. For the flower stem I used a back stitch with the blue silk ribbon. 
The butterfly is made from the purple silk ribbon, edged with cobalt blue beads.
The cross ribbons are vintage upholstery trim and the buttons are mother of pearl tied with Twinery twine.
And here is the finished product.
Thanks for taking a closer look!!!

~charity~

Sunday, August 12, 2012

Pirate Lessons {start early}

Practical Scrappers is featuring ledger and notebook papers today. I love this look so I was thrilled to participate. My son chose this pirate paper while on a recent trip to Crafts Direct. Given the right title it fits this photo perfectly.
I always have interesting bits of paper about so I dug into my "oddities" bin and pulled out notebook paper to mat my photo.
 To add to the ledger theme I punched shapes from an accounting notebook. The shapes seemed a little bare on their own so I tied them with twine to give them dimension.
Since one skull is never enough for my pirate boy, I added a few extras with flocking.
Supplies:
Papers: MME and stash
Punches: Stampin Up and The Paper Studio
Twine: The Twinery
Ink: Stampology
Stamps: CTMH and Hampton Arts
Flocking: EK Success
Alpha and Chipboard: MME
Tiny Type: My Little Shoebox

~charity~