Saturday, December 31, 2011

just a note

When you need classy and scaled back reach for Authentique. Here is yet another card made with Blissful, Foundations and Journey, Icons. I inked the edges of Blissful with American Crafts, Charcoal pigment ink and used Doodlebug Designs twine. The buttons are random former residents of MIL's sewing drawer. :)
This took only a few minutes to make, but it's cheery colors and "made with love" air will leave a happy impression on it's recipient!


The sketch and challenge details can be found here.
You have till January 4th to play along.  Get Crafting!!!

~charity becker~

Friday, December 30, 2011

Sunday Picnic

Webster's Pages, the paper I love to covet!!! Here is a preview of Sunday Picnic, this yummy line goes on sale Monday. My favorite images are the kites and bicycles, and I ADORE the colors!


check out the link below...this scrumptious line could be yours for FREE!!!
http://websterspages.typepad.com/webstershome/2011/12/win-the-entire-brand-new-sunday-picnic-collection.html

~charity becker~

Pony Love

I am totally LOVING my three weeks off school. There are so many sketch challenges I have time to participate in now! Today I've got one from Sketchy Thursdays.

pony love
Of course this layout begs the question...how long can one hoard MME Lost and Found? Apparently QUITE A WHILE! The sketch was a fairly simple one, and this paper is already so embellished that there was little to add. I did fussy cut both birds and the cage as well as ink the edges with CTMH chocolate. The alpha is Webster's Pages, Letters from Paris (hoarding alert). Here is what the sketch looks like...

If you get a chance join in the challenge! Find Sketchy Thursdays page here: 

~charity becker~

Thursday, December 29, 2011

Dreaming of Voyage

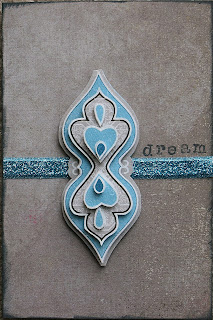
The curvy design elements of Journey, Voyage (Authentique) are really fascinating me. It looks as if someone took a window opening from the Taj Mahal and painted a bit of blue sky around the edges.
Here's a simple card with lots of oompha. I fussy cut 5 levels of the same design and applied each set with dimensional adhesive. I adhered my center piece and sparkle ribbon to Blissful, foundations and inked the edges with Amercan Crafts, Charcoal pigment ink. The sentiment is stamped with Hampton Arts mini-stampers.

dream

~charity becker~

Wednesday, December 28, 2011

Rest and Relax

Totally loving the card and LO challenge over at Authentique this month. Here's a card inspired by the sketch:

Rest and Relax

Simple, to be sure, but sweet and to the point as well! I used Blissful foundations as well as Journey, Voyage. For the sentiment I added an Icons diecut from the Journey collection. The twine is Doodlebug Design...but looks like it was made to match the Journey collection.

~charity becker~


Tuesday, December 27, 2011

Christmas Deals

A trip home to Minnesota always includes a stop at Crafts Direct in St. Cloud. The place is HUGE!!! And they aren't afraid to flaunt it...


Not only do they have an unbelievable selection of Scrapbooking goodies, they have an additional "store front" for closeouts. What could be more fun?  Knowing that adhesive is on my 'most wanted' list I was on the hunt for bargains. And did I EVER cash in!!!


All that American Crafts adhesive...
$13.50!
Yep, I'm in LOVE. *sigh*
I also picked up a few other items, some Authentique Journey and Blissful as well as these trims, twines and tools...


But why no photo of my yummy new pieces of Authentique? ummm, I was in Minnesota for 4 whole days. It's mostly in pieces now! But starting tomorrow I'll feature the fruits of my labor.

~charity becker~


Monday, December 26, 2011

Artsy Contrast

Here's another layout for the Authentique layout challenge, found here. http://authentiquepaper.blogspot.com/2011/12/december-sketch-challenge.html
I used Gathering for this one, but this time I used deep, somber tones to bring out the sunset colors of my photo. I used the dark side of the Foundations paper as well as the dark side of Reminisce. I also used a title card from Tabloids.


To complete the contrast effect I used vintage crepe paper to add vines and orange onion-netting for flowers. A quick zig-zag of yarn around the edge accented the orange. A stripe of teal twine and the title card tied in the corresponding portions of the sketch.

~charity becker~

Saturday, December 24, 2011

Merry Christmas

So much can be said about this holiday and how to celebrate. I found this photo floating around Facebook that expresses my views exactly.


A very Merry Christmas to you and yours!

~charity becker~


Friday, December 23, 2011

Over the river and through the woods...


That's right, every Christmas we go "HOME". We usually leave after my husband get's off work and drive late at night. When the kids wake up the next morning they are at Grandma's. The joy on their faces is matchless. 'Course my blog is automatically posting because we left for Grandma's last night!!! 

Patterned papers from this card are all Webster's Pages Botanical Christmas. Gold stickles highlight the designs and CTMH stamps add the border and bird at the center. 

Happy Holidays from Minnesota.

~charity becker~


Thursday, December 22, 2011

Ornaments

Just a little show and tell. I  made these sweet little ornaments for this year's tree. They are simple but "home-made beautiful".


I looped about 8 strips of twine over my finger, threaded a wooden button and tied it around the top, then laced another piece of twine through the shell and the tassle. Voila! Here are some close-ups.


~charity becker~

Wednesday, December 21, 2011

Missing Italy

The airforce has given us amazing travel opportunities. Aviano, Italy still holds a special place in out heart. Our house backed to a cornfield with an unbeatable view of the Alps, Piancavallo to be exact. This months sketch challenge over at Authentique provided a fabulous opportunity to show off this picture.


For this LO I went simple, I wanted to highlight the gorgeous colors in this photo. I used the following papers from the gathering collection: Foundations Bi-fold, Reminisce, and Bloom. I used die cuts from  'Headlines', 'Tabloids', and 'Icons'. The flowers I cut from the Bloom paper and inked with CTMH Outdoor Denim. The alpha is left over from a kit whose name I don't remember, but they match perfectly!

There is still time to enter this challenge! Find it here at  http://authentiquepaper.blogspot.com/2011/12/december-sketch-challenge.html

~charity becker~

Tuesday, December 20, 2011

BLT Bites

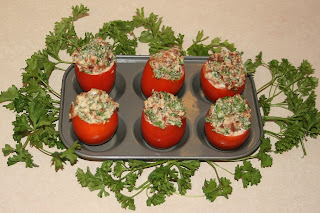
Hubby is off work for a week and we are enjoying some time together. While the kids are at school we are making all our favorite foods. You know, the ones they won't eat because they are "yuuuuucky! Yesterday we got out the cutting boards and fry pan and made these delicious, tiny salads.


I found the recipe a few years back and have modified it a little. Here is what you'll need:

6-8 small plum tomatoes (mine fit into a 1/4 cup measure)
1 pound bacon cooked and crumbled
1 cup fresh parsley chopped
1/3 cup green onions chopped
1/4 cup grated Parmesan cheese
1 cup Mayo or Salad dressing

Cut a thin slice off the top of each tomato. Scoop out pulp and discard. Invert tomatoes to drain. Combine remaining ingredients in a small bowl. Spoon into tomatoes.

Bon appetit!

~charity becker~


Monday, December 19, 2011

Tea anyone?

Being in desperate need of square, kraft envelopes for my next scrapping project, I stopped by my favorite discount store. Unfortunately, they had every thing BUT kraft envelopes. In fact, the ones they did have that they termed kraft were ick yellow. So I ended up with Open End Catalog Envelopes 7.5in X 10.5in in bright white.
What's a girl to do? I turned to a 90's fad, Tea Staining. I've tea stained a tablecloth to disguise a spill, and a chunk of lace now and then to give it vintage flair, but this was a first for paper. Still, the principals are the same and I definitely got the desired effect.

bright white ---
--- tea stained

To begin, pour about two quarts of water into a large pot and add 8 tea bags. Bring to a boil and then let cool. After about 20 minutes the tea should reach full potency. Stack several old towels beside the pot to aid in drying. The tea will stain the towels as well as the paper so choose wisely.

Cut envelopes to desired size and open envelope flap (for even staining).

Immerse envelope in tea, handling with care as the wet envelopes will tear easily.


Remove envelope and lay on towel, lay second towel on top and pat to absorb excess liquid.


Lay envelopes to dry on flat surface. Drying time will be several hours, I leave mine over night.


The paper will warp as it dries, but can be ironed flat. I prefer the "lumpy" affect. It adds to the shabby chic style I love!


~charity becker~

Saturday, December 17, 2011

Dear Santa...

Hope you have all your Christmas shopping finished. Our final package came in from Amazon earlier this week. Hubby will take the kids to Christmas program practice today while I wrap the last few gifts. The gift I most wanted is neatly wrapped and waiting on the grade books...over 100% average in each of my 5 classes for this semester! So thrilled!
Here's another Webster's pages Christmas card to get you into gift wrapping mode!

Dear Santa...


Webster's Pages, Botanical Christmas paper with Close To My Heart Stamps and ink.  All embellished with gold stickles, and wrapped in snowflake yarn. Enjoy your Saturday!

~charity becker~

Friday, December 16, 2011

One last Professor Gift

I've put up various examples of cards I made as gifts for my professors. In all I gave 5 professors, 6 greeting cards each of various themes. Two of my professors have become particular friends of mine. I wanted to show them an extra measure of appreciation so I planned a little something extra for their gift bags. For my Algebra professor I included 5 recipes and a fajita seasoning I use ALL THE TIME! For my 1920's History professor I decorated a picture frame (following the theme of the cards I posted here: http://menemenetekeluniversity.blogspot.com/2011/11/roaring-20s-inspired.html )


I found an inexpensive metal frame and spray painted it white. For embellishment I used bits of the Webster's Pages, Hollywood Vogue line. I glued lavender trim around the outer edge of the frame. I added some silver, sparkle trim on two sides. Getting the silver trim to adhere to the frame was difficult, so I covered the ends with vintage sequin trim. I strung some lavender drops on silver twine and wrapped them around the left side of the frame. To finish off the project I adhered a bloom from Webster's Pages floral bouquets in the upper corner and a journaling card in the lower corner. After a quick step back I added tiny butterflies embellished with silver stickles. Finally I replaced the picture mat with packaging from a WP trim card.

Dear Blog readers, the expression on my professors face and the repeated exclamations of surprise were so delightful. A crafter wants nothing else as much as she wants her work to be appreciated. My cup of satisfaction was definitely running over!

~charity becker~

Thursday, December 15, 2011

Take a deep breath...

Finals week is nothing if not packed with hour after hour of studying. This term end was no exception. To add to the melee was a lovely little virus going the rounds of our house. My son was out of school all day Friday and my oldest daughter was out both Wednesday and Thursday.
The work of a Mom is never done so I spent my days here:


and my nights here:


Needless to say, I can't wait for my last two finals to be finished tomorrow...but till then, it's back to the books!

~charity becker~


Wednesday, December 14, 2011

Christmas Greetings

Finals week is upon us and scrapping is at an all time low. However, I have a few more Webster's Pages Christmas cards to feature. This one made from the Botanical Christmas line. Bits of fussy cutting and stickles with a few CTMH stamps thrown in for good measure!


~charity becker~

Tuesday, December 13, 2011

A very Doggy Christmas to you!

Because our family includes 2 adorable four-legged members, we have to bake up a larger variety of Christmas treats. If you've got puppies as sweet as ours you'll want to try out this recipe!

Dog Biscuits
1 egg
1 cube bouillon
3/4 cup water
1/3 cup butter
1/2 cup powdered milk
1/4 teaspoon salt
3 cups whole wheat flower

Place water, bouillon, and butter in a large bowl. Microwave on high for 1 minute. Stir in salt and powdered milk, add flour 1 cup at a time. Dough will be stiff. Roll out 1/2 inch think on lightly floured surface. Cut into shapes. Place on greased cookie sheet and bake @ 325 F for 35 to 40 minutes. Turn off heat and leave in oven for 1 hour.


We use an adorable bone shaped cookie cutter to finish it all off!


Have fun baking up some treats for your dogs!

~charity becker~

Monday, December 12, 2011

Chevrons and Machine Stitching

Scrapbook Steals has a guest sketcher the first Wednesday every month. For December we were treated to a project by Heather Conklin. She made a great sketch using a new trend in design elements...the CHEVRON!


Ol' stick-in-the-mud me is just not sure I like chevron's yet. But after some thought it seemed like fun to incorporate them with machine stitching. Out comes the ruler!!! Since it's a double page spread I had time to perfect my measuring system and snag some pics so you'd know how to duplicate the process.

First off, this delightful sketch has room for at least 7 photos. That was perfect for some pics we took a few years back at my nieces High School play, "Beauty and the Beast". After the play the girls had the opportunity to take pics with the cast. Because these pics were taken in a crowded high school the backgrounds are CRAZY busy and overload was imminent. I choose a mild color scheme and only two patterned papers. I also added a layer to the original sketch to tone down my pics yet tie in their matting. The instructions are as follows:

Step 1 Cut your base paper to 11x12.
Step 2 Cut two 1 x 12 inch strips and all your photo mats from an alternating color.
Step 3 Using a pencil and working on the back, measure and trace a horizontal line the length of your paper, every two inches, starting at the base and working up.
Step 4 Place marks along your lines at 3, inch intervals. Erase the mark at 3" and 9" on your top line and erase the mark at 6" on your last line.
Step 5 Play dot-to-dot! Draw lines from the top right edge of line 1 (at the top of the page) to the 3" mark on line 2. Then from the 3" mark on line 2 to the 6" mark on line one. Next draw a line from the 6" mark on line 1 to the 9" mark on line 2. Last draw a line from the 9" mark on line 2 to the far left edge of  line 1. Repeat this process for the following 3 lines. Your page should look like this:


Step 6 Machine stitch the chevrons drawn on the back of the page. This step will leave strings everywhere. These should be attached or they will break and unravel.
Step 7 Tie off the strings or pull them to the back (where the pencil lines are) and fix them in place with a piece of scotch tape.


Step 8 Adhere the one inch strips of the alternate paper to the top and bottom of the page so that a 1/2 inch of patterned paper shows at each end.
Step 9 Back to the machine. Using a zig zag stitch this time, sew a line the length of the paper where the two patterns meet.
Step 10 Adhere photos to mats and mats to page. Embellish as desired.


A simple page that lets the photos shine, but incorporates trendy design elements.  It's a win-win situation!
I used MME Lush paper, Prima flowers and leaves, and Creative Charms ribbon.

Catch Heather's latest crafty escapade on her blog. http://goldiecar.blogspot.com/
As always, keep yourself in the loop by liking Scrapbook steals on facebook and checking out the blog for great crafting ideas. http://scrapbooksteals.stealnetwork.com/wp/

~charity becker~


Saturday, December 10, 2011

Choke Cherries

It has been dreary and cold these last few days. I'm ready for something bright and warm. In defiance of the weather I cooked up this sunny Layout.

gather ye Choke Cherries while ye may


Lots of fun details on this one. I started with a Sketchy Thursdays sketch http://www.sketchythursdays.blogspot.com/ and the WP Country Estate collection. I pulled out some silhouettes I'd cut using the Nursery Rhymes Cricut cartridge and used them as masks. I misted over my masks with Tattered Leather, Glimmer Mist by Tattered Angels. While that was drying I fussy cut nearly a full page of hydrangea blooms to serve as a backdrop for my photos then inked and finger crimped their edges. I punched and inked a border strip for the base of the photos. Then I wove lace into the border strip and bunched it "strategically".
Once the misting was dry I cut a slit above my masked figures with a craft knife and began assembling my page. First I adhered the base of the photos, then the border/lace strip. Finally I began layering the hydrangea blossoms behind the photos.
I cut a paper flower in half and with the help of Black Diamond stickles I had 2 butterflies. I found some pink flowers that echoed the colors in my photos and adhered them between the silhouettes. Finally I stitched vines for my Sweet Peas. After inking the edges of the L/O base I added the title. The entire page took me about an hour. Yep, I had too much caffeine before starting!

~charity becker~

Friday, December 9, 2011

Spare time to Trim

Christmas, with all its decorating fun is upon us! The kids have been anxious to get the tree set up and start placing ornaments. 'Course we didn't buy enough light strings, then one of the fairy ornaments broke, and we had to wait 2 weeks to add the candy canes, but decorate we did. The kids had SO much fun placing each ornament. This year we let them each choose a package of ornaments (with the guidance of a color scheme and price limit) for the tree.


Lori went reasonable and choose a package of "unbreakable" glittered balls. Silas went flashy and picked peacock feathers.


 Annalys spent it all in one place on a Hello Kitty ornament.


 It's true the tree has it's own way of seeing things, but it's equally true that it is a thing of beauty and much admired by the kids. Hope you've got your tree up by now or have that happy event planned!

~charity becker~

Thursday, December 8, 2011

Secret Group

Have you ever wanted to be part of a 'secret group'? Yes, I DID just whisper 'secret group'! Images of special handshakes, passwords, and closely guarded rituals instantly come to mind. Recently I was invited to join a 'secret group' on facebook. While there is the fun of being private pals and being privy to specific information, what this group is really all about is supporting each other! We wrap it all in dialog about scrapbooking and other crafts, but their isn't a day goes by but another one of our Peeps shares her heart with us. And who can place value on such a gift?

Along with meaning the world to each other, we hold scrapbooking challenges. The winner is drawn by random.org and a prize goes out to the lucky crafter. Last month random.com chose me! The prize provider was Brettaney Quinton. She sent me this ULTRA fun pack of goodies!!!


Needless to say, I was ecstatic! Here is the page I entered for the contest

Their Family


I used a Scrapbook Steals sketch, Little Yellow Bicycle patterned paper, Basic Grey cardstock stickers, EK Success alphas, and Tim Holtz grunge board. The page and grunge board I inked with CTMH ink.
The challenge was a blast and I LOVE the prize pack. Check out Brettaney's blog here http://brettaney.blogspot.com/ and give here page a little love, from me!

~charity becker~

Wednesday, December 7, 2011

Funny Little Bug

When my daughter was born, a dear friend of mine sent a roll of black and white film and a sweet picture frame. In her card she claimed what every baby needs is a photo shoot with black and white film. Life has a way of delaying things and we didn't get her pictures done till she was nearly two. But for the said photo shoot we put her in a ladybug costume and let her "frolic" around the yard. These pictures were perfect for this weeks Sketchy Thursdays challenge. Found here: http://sketchythursdays.blogspot.com/2011/12/1201-sketch.html


In October I purchased some delightful Bo Bunny, Welcome Home and Et Cetera from a fabulous boutique in Rapid City, SD. Stacy is the proprietor of Altered Art and Scrap Playground and is living out her dream, by enabling all us scrapbookers in our addiction. I've been dying to use these yummy papers and finally quit hoarding them and got out the trimmer.


Of course, being me, I had to deviate from the sketch. I choose Tattered Angels Glimmer Mist and a pair of "buggy" masks to embellish the corners. I included a 'frame' cut from one of my sheets and 'sheet music' cut from another. After the Dragonfly glimmer mist, very little detail seemed necessary so I inked the edges, added wooden buttons with twine and adhered it to a patterned paper from EK Success. Cosmo Cricket tiny type and AC Thickers finished up the title for me. The final touches were stitching the frame to the base page and tying twine over the title.

Check out Stacy's blog for ideas and like the Altered Art and Scrap Playground on facebook!
http://www.scrapandplay.blogspot.com/
https://www.facebook.com/#!/scrapandplay?sk=wall


~charity becker~

Tuesday, December 6, 2011

One Dish Comfort Food

It's no secret, going to school full time isn't very conducive to a clean house and homemade meals. What do you do when you get home from school with an hour or so till supper but not an ounce of thawed meat in the house? Try out this recipe:
Ingredients
8-10 frozen chicken thighs (flash frozen is easiest to seperate)
2 cups rice
3 cups water
Generous amounts of Fajita seasoning
(My favorite is Bolner's Fiesta Brand. Available at many Wal-Marts)
To begin, pre-heat oven to 350. Measure 2 cups of rice into a 9X13 oven proof dish. Sprinkle liberally with Fajita seasoning. I use at least a tablespoon.
 

Place chicken on rice, pack the pieces in without overlaying. Add 3 cups of water, sprinkle again with fajita seasoning. Bake uncovered for 1hr and 15min or so. Check chicken with thermometer. Serve with fresh veggies or green salad.

Hope your family likes it as much as mine does!!!

~charity becker~

Monday, December 5, 2011

Lady of the Lake

Wednesday after Wednesday, Kristy Lee puts up a fabulous sketch on the Scrapbook Steals blog. This week I felt like working with some MME Hattie...which I originally purchased from the Steals network. Usually I re-interpret the multi photo sketches as one photo and various patterned paper shapes. This week I had to be different. I turned a 1 photo sketch into a 4 photo collage. I love the way it turned out.

MME Hattie, CTMH ink, Glitz Design Stamps, Spare Parts brads, Girls Paperie Alpha, Jute

Here is the original sketch:


 I interpreted the circles as framed portraits and the punched border as twine. The swirl on the lower left corner I turned into lake waves by using the edge of a diecut.


Check the Steals page twice daily for Fantastic deals: http://scrapbooksteals.stealnetwork.com/

~charity becker~

Saturday, December 3, 2011

More Professor Gifts

Today's post features the final installment of greeting cards for my professors. These cards were designed with my Biology professor in mind. She teaches Biology at night, but her day job is in Entomology. Yep, that's right, she studies bugs. She's a no-nonsense person with a simple habit of dress and unassuming lecture delivery. Not much room for lots of glitter and trim. She does however have grand children. So I focused on simple cards she would enjoy giving that the kiddos could relate to. MME Lime Twist instantly came to mind. I again used Kristy Lee's MCM #58 sketch. http://scrapbooksteals.stealnetwork.com/wp/2011/11/14/american-crafts-hollyday-monday-card-madness-58/

UP:


MME Lush and Lime Twist for these papers. CTMH ink, and a Hampton Art stamp. The trim is bias tape by Coats and Clark. The punch is EK Success. I inked and distressed the papers to give this card a sophisticated air.

LIFE CELEBRATION:


More MME Lime Twist on this card. The star motif is done in such happy colors. The brown, star diecut is CTMH. I used finger crimping on the edges to accent its use as a frame. The stamps and ink are CTMH. The twine is more of the Lime Twist collection.

HAPPY DAY:


All right, enough of that no-glitter rap. It's time for some shiny embellishment. This card I cut from a piece of MME Lost and Found collection. Already glittered and stamped I added the alpha to complete the sentiment and some twine to "tie it all together". I didn't have the letters I needed so I improvised. I used a 'g' from Making Memories Fa La La alphabet, trimmed off the tale, and added it to the 'z' banner. A little CTMH ink on the edges and this card was finished.

And that's one more set of gifts complete. Next up? WP Christmas cards. I'll post when I have them finished. Get ready to dust the glitter off your clothes. I've been holding back long enough!!!

~charity becker~