Tuesday, May 31, 2016

Friend

Thanks for stopping by my blog! Today is the
Kreaxions DT Reveal. This month our theme is Flowers.
Follow the link ^^^ to see what the other ladies have created!
~ Friend ~
I have been so inspired by all the mixed media tags popping up on Facebook and Instagram. The designers create such gorgeous pieces. I tried my hand at it and put together this mash-up of glitter, flowers, and paper.
SO MUCH FUN!

For more mixed media delight try out one of these pages on Facebook:
Finnabair and Friends - Open Studio
Art Anthology Adventures In Art
The Mixed Media Monthly Challenge

Supplies:
Paper:Craftsmith
Ink:Colorbox, CTMH
Mist:Colorbox
Embossing Powder:WOW
Flowers:Prima
Flourish Dies:Echo Park
Sequins:Spiegel Mom Scraps
Stamps:CTMH, Kaiser Craft
Glitter Paste:Bo Bunny
Trim:Stash
Punch:Kreaxions #302

Scrap On!

~charity~

Saturday, May 14, 2016

How to Make a Beautiful Box From a Vintage Book

For a lovely teacher appreciation gift, read through this tutorial on how to make a beautiful box from a vintage book. I created this project for the Robin's Nest DT Hunt. I got a little carried away, but Si's teacher loves it! 
~ Captured Memories ~
The Hot-Air Balloon, Ferris Wheel, and title on the cover of this book is stamped and heat embossed. This highly decorated book opens to reveal a mini-album and hinges with fluttering pennants.
The inside cover is an illustration I fussy-cut from a 12x12 sheet of paper. I added Stickles and Bling, Gems and Tear Drops, Stamping and Embossing Powder until the design was just about opulent enough!
~ Hollow Book ~
 
But before I could take the book from Vintage to Wow I had to hollow it out to hold the mini-album.
 I began by selecting the first section of pages and wrapping parchment paper around them. Bound books can be placed on their end with the covers pulled back so that the sections are visible.
 I taped the parchment paper to the front to hold the pages out of the way.
 On the inside I marked a cutting edge of 1/2 an inch. Next I made a 1:1 glue/water solution. I painted this on the outer edge of the pages of the book. It soaks in quickly with an old book so I painted on a few layers.
 I straightened the parchment paper so it fully protected the unglued portion when the book closed. I placed a few encyclopedias on the top to press it down and left it for a weekend. To add to the vintage feel I used Inka-Gold metallic rub along the edges of the pages. I painted them with glue and let them dry again.
When the book was completely dry I cut along the lines with a utility knife. To keep the sides of the cavity as straight as possible I tried to cut in layers of about 20 pages. I painted the inside edges of my pages and let it dry again.
I released the pages I had wrapped with parchment paper and glued them over the top to cover the mess the glue had made when it was pressed. I cut the center out and my hollow book was finished!
~ Hinges ~
To hold the book open for display I made simple hinges of embroidery floss. The trick is to use enough floss so that the book cover leans slightly past the center. 
First I pierced a hole 1/2 inch in from the corner of the front cover.
 I threaded floss through the hole so that it ran over the top and around the side of the book.

  I tied the floss at the side and stretched it to the opposite edge of the book.
I threaded it through twice and tied it off. 
After doing this to each side I added banners from washi tape. They held the ends of the floss and framed the design.
~ Mini Album ~
The mini-album for the inside of the book was fairly easy to make. I measured and cut the pages to fit inside the hollow. I inked the edges of the papers and stamped the corners.
Instructions to make the Hot-Air Balloon on the front cover can be found here:
Hollow Book Supplies:
Paper:Glitz Design
Flowers:Prima
Gems:MME, Prima, Recollections, Glitz
Tear Drops:Vintage
Stickles:Ranger
Stamp:Kaiser Craft
Ink:Clearsnap
Embossing Powder:Wow
Floss:Prism
Washi Tape:Love My Tapes
Metallic Rub:Inka Gold

Mini Album Supplies:
Paper:Fancy Pants, Pink Paislee, Kreaxions
Floss:Prism
Brads:Recollections
Ink:CTMH 
Stamps:Bo Bunny, Glitz Design, Inkadinkado
Trim:stash

Scrap On!

~charity~

Escape

I love the look of Hot Air Balloons floating against the blue sky or the bright colors of a sunset. They look like a most elegant form of
~ Escape ~
To make this balloon you will need the following supplies:
3.5 and a 2.5 inch circle.
3.5 x 6 inch card stock
2 colors of Floss, 4 ft long
3.5 and 2.5 length of trim
Assorted mini-brads
Cut the 2.5 inch circle in half, then cut 1/2 inch off the rounded end.
Ink the edges of both circles.

Use dimensional adhesive or craft foam cut to size under the circle.
 Adhere the circles to the card front.
Use the mini-brads to tack the trim to the center of the balloon and the rim of the basket.
Thread the floss between the brads, using one color at a time and skipping every other brad, as shown. To keep the floss from pulling too tight place a sharpie or other cylinder between the card front and the floss as you wrap it.
Tie off the ends and glue them to the under side.
Place card front on a 5x7 card base.

Supplies:
Paper:Fancy Pants, Pink Pasilee, Craftsmith
Brads, Craft Foam:Recollections
Floss:Prism
Trim:Stash
Ink:CTMH
Sentiment:Echo Park
Alpha:Webster's Pages
Circle Cutter:Kreaxions

Scrap On!

~charity~

Monday, May 9, 2016

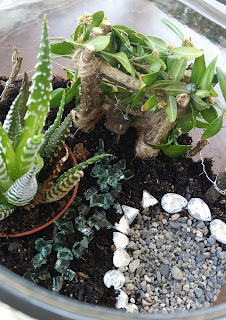
Fairy Garden

Mother's day isn't just for moms. It's for Grandmas and Great Grandmas also. We are privileged to live in the same town as my grandmother. She is always putting together gift bags for the kids and I. For Mother's Day we made her this Fairy Garden.

The glass container is a thrifting find. Honestly, it is one that has sat around for a year waiting to be used. But I am happy I had it!
To begin we drew out an idea on paper. It was NOT to scale and caused a bit of confusion, but we worked it out in the end. Each of us made a piece of our display.
Mine was the arbor. I made it much to large the first time. I used wire and branches that were much to big. I was sent back to make something more delicate and "fairy-ish". This time I used branch-lings and twine. For stability I hot glued the sticks together then wrapped them with twine. I added leafy cuttings between the sticks the structure was finished.
Si put together the fence. He cut branchlings into small sections and wrapped them with wire. The plant is a $4 succulent from Walmart. A plastic sleeve is buried to the rim and the pot fits right down inside. It can be easily removed for watering.
Lori is the sort of person that scoops up bits of this and that while she is walking home. She was fascinated by the square bits of broken safety glass she encountered one day and stored them away. She made the garden path with them.
The pond was AJ's creation. She used clear, shaped rhinestones to mark out the edges of a little pool then used tiny gravel for the water.
Grandma loved the fairy garden and will show it off proudly. 
We truly enjoyed making it for her!!!

Scrap On!

~charity~

Saturday, May 7, 2016

Seven

Birthday celebrations at our house today!
My youngest was so pleased to discover he was born on the same day...though not the same month...as his Dad and his Sister.
Mama got SKILLS!!!
~ Seven ~
The "7" was elsewhere on the paper. I cut it out, popped it up, and framed it with a ledger print.
Quick Tip: The multiple patterns make this card look more complex then it really is.

Supplies:
Paper:Bella Blvd, Fancy Pants, Craftsmith
Circle Cutter:Kreaxions
Punch:Kreaxions #301

Scrap On!

~charity~