Tuesday, December 24, 2019

How To Add Hand Stitching to Cards

These mixed media cards offer hand stitching details. They feature layers of specialty papers along with watercolor images, hemp cord, and sentiment in flowing script. Canvas Corp's "Nautical" and "Compose Your Life" collections are represented here.
Directions:
 Step 1: Stamp image on watercolor paper, heat emboss, paint with watercolors. 
Embossing the image gives your watercolors boundaries. The paint is more likely to stay exactly where you place it when  you use this technique.
 Step 2: Cut and adhere layers of cardstock.
The Mermaid is 4.5 x 3". The Anchor paper is 5.5 x 3.75". The Kraft paper is 8 x 6", folded. 
 Step 3: Position Cord around mermaid perimeter, stitch in place.
My final cord length is about 20".
I pierced holes at each corner of my image as well as on the sides. I started the thread at the back, ran it through the paper to the front, over the cord, and to the back through the same hole. I tied off each stitch before progressing to the next one.
 Step 4: Tie the cord into a loose square knot at the top of the card. Attach the top of the knot with adhesive or a couple more stitches to hold it in place.
 Mermaids are one of my favorite images. This imaginary creature of two worlds can be painted any color. Flowing hair, beautiful voice, and centuries of legends make her untouchably perfect. Yet, this lovely being conforms to each persons imagination just as they will it.
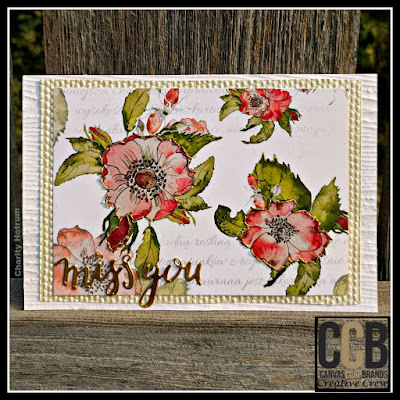
 This second card embraces the watercolor style with a little less work. Layers of hand made papers are topped with printed watercolor roses. Gold stitching outlines the flowers and gold foiled paper scripts the sentiment. 
Directions:
 Step 1: Cut papers. Adhere Roses to Ivory paper.
Roses Are Red paper is cut to 3 1/2 x 5".  Ivory Seed embossed paper is cut to 3 5/8 x 5 3/8". Wood Grain embossed paper is cut to 4 x 6". White Cardstock is cut to 8 x 6" and folded.
 Step 2: Outline roses with gold thread using a back stitch. 
Secure the ends with tape so the knot doesn't pull through. Stitching on paper must be done gently or the thread will cut the paper or leave rough edges.
 Step 3: Adhere Ivory paper to Woodgrain paper and Woodgrain to folded White cardstock.
Step 4: Cut sentiment from Gold Foiled paper with Die. Adhere to card front.
In my region wild roses bloom in extravagant patches by my birthday. They seem as happy to be alive as I am! A card bearing their lovely form is never out of style.
These cards were originally posted on the CCB blog in 2019.
Craft On!
~charity~

Thursday, December 12, 2019

How To Make a Layout with Hand Painted Pansies

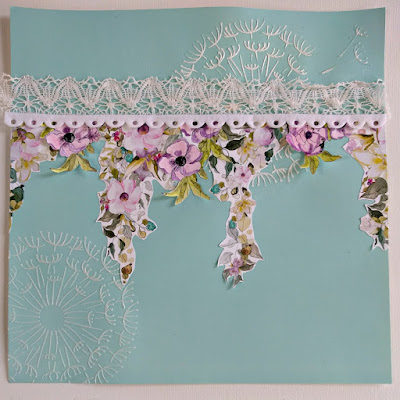
This layout with hand painted pansies celebrates one of the many trips we took when my girls were little.While living in Europe we explored the beautiful country of Croatia. These photos were taken in the Roman arena in the coastal city of Pula. My oldest daughter wandered from tier to tier picking flowers (cvijeće) and making dandelion bouquets.
~ Cvijeće ~
Directions:
 Step 1: Place stencil in upper right corner and spread 3D Glossy Gel over it. Sprinkle with White embossing powder, heat to set. Repeat for lower left corner.
 Step 2: Fussy cut 8x8 Bohemian Romance: Live Freely paper into four sections. Draw a horizontal line 3.5" down from the top. Evenly space the fussy cut images across it, adhere.
 Step 3: Paint the 8x8 Bohemian Romance: BoHo Dreams paper with Glimmer Glam.
 Step 4: Fussy cut BoHo Dreams into flower sections and place over gaps on horizontal line. Reserve remaining flowers and leaves for later use.
 Step 5: Layer trim and lace over horizontal line, adhere.
 Step 6: Place photos then slip Architextures Findings: Garden Stakes behind them. Align Architextures Findings: Iron Fence with trim.
 Step 7: Die cut and assemble flowers from 8x8 Bohemian Romance pink, handmade paper.
I used two sizes of three-petal die. I painted the flower center and then the petal tips. I pinched each petal between my fingers and thumb to give them shape. I glued and stacked the flowers then added a dot of yellow Stickles in the middle.
 Step 8: Adhere Painted Pansies around the photos, adding leaves reserved from the BoHo Dreams page.
 Step 9: Place title over trim and iron fence.
Because my title is in Croatian, I added the same word under the main photo in English.

Craft On!

~charity~

Saturday, November 23, 2019

How To Make Tri-Sided Canvas Ornaments.

For something unique this year make a set of Tri-Sided Canvas Ornaments featuring vintage art and a steampunk flourish. If you are itching to add personal touches to your Christmas decor these beautiful ornaments will hit the spot! Glimmer Glam sets the tone while Parchment Rub-ons provide the illustrations. Architexture Findings and Industrial Gears add the final touches. With eight different mini shapes in canvas or burlap the options are plentiful.
7gypsies Rub-ons combine the look of vintage art with the ease of pre-inked rubber stamps in countless designs. Select an image, trim it out of the parchment paper, and rub onto your project. With the ability to meld with paper and fabric these Rub-ons offer upgraded vintage appeal! 
 Step 1: Paint Glimmer glam on one side of Canvas Mini Shape. 
I painted the edges heavily and brushed the center lightly. If you get too heavy a color on the canvas rinse it with water and retouch as necessary. Allow to dry thoroughly. A heated iron will heat up the process.
 Step 2: Add Parchment Rub-ons to the canvas shapes
It takes heavy rubbing to transfer the images onto canvas but the result is worth it. Alter images or layer several to customize your ornaments. For the round set I cut and turned the cats tail so it fit on the canvas. The Triangle ornaments have multiple gears overlapped.
 Step 3: Cut cord into 3 lengths. 11", 5", and 3" and attach to canvas shape. 
Tie Architextures Findings to one end of the cord lengths. Tie a large knot in the other end of the 5" and 3" lengths and 4" up from the Finding in the 11" length. The final goal is to have the findings hang in descending order. Stitch cord to lower end of canvas shape, just below the large knot. Thread a metal gear onto the top of the 11" cord and tie a sliding knot to keep it in place. I like to use a Poacher's Knot for this maneuver. It allows me to change the length of the cord.
 Step 4: Stitch the sides of the shapes together, leaving an opening at the top and bottom. In the above illustration Side B is stitched to side C, Side D is stitched to side E and Side F is stitched to side A.
 The final product will rotate on its axis, displaying each side as the ornaments are doing in the photo below. The lights on the tree will make the glitter in the paint sparkle as the ornaments turn.
 The Architextures Keys had holes ready pierced. I had to use a large needle to thread the Tiles and Coins onto the cord. I also placed corresponding keys, coins, or tiles back to back so that the turning ornament did not have an obvious "back side".
  At our house decorating for Christmas is a much anticipated event. My children sit around sipping eggnog from champagne flutes while taking turns dressing the tree. Ribbons, beads, and bulbs flow through their fingers as a dusting of glitter and tinsel drifts toward the floor. Many flavors of candy canes finish off the tree. The cats drape themselves around the room, basking in the glow of the lights and take great interest in the arranging of the Nativity Scene.
This project was originally posted on the CCB blog in December of 2018.

Craft On!

~charity~

Sunday, November 10, 2019

How To Make Sugared Fruit from Paper

In December of 2014 I used paper to make a long standing Christmas tradition: Sugared Fruit. This tray of sugared fruit is made from an assortment of accordion folded circles.
I cut the assorted sizes of circles using the
Although each piece of fruit has a variety of accordion sizes, each accordion rosette is made from a single circle of paper.
Instructions:
Step 1:Cut a 4 inch circle from cardstock.
Step 2:Score your circle into 16ths as shown in box 1 and box 2
Step 3:Cut a 1.5 inch circle out of the center.
Step 4:Bunch center of the circle together to create an accordion flower, secure to a paper circle base with adhesive. I use hot glue which looks a tad messy so I add a paper circle on top.
If you make accordion folds from circles 2.5inches or smaller you will need to cut a 1inch circle from the center.
Each piece of fruit is a stack of accordion folds (AF) glued to circles.
Here are the dimensions:
Apple and Orange:
1 inch Circle Top with loop of twine threaded.
3.75" AF, 1.5" Circle
4.25" AF, 1.5" Circle
4.5" AF, 1.5" Circle
4.25" AF, 1.5" Circle
3.75" AF, 1.5 inch Circle Base

Lemon and Lime:
.5 inch Circle Top with loop of twine
2.75" AF, 1" Circle
3" AF, 1.5" Circle
3.25" AF, 1.5" Circle
3" AF, 1" Circle
2.75" AF, 1 inch Circle Base

Pear:
.5 inch Circle with loop of twine
2.5" AF, 1.5" Circle
3" AF, 1.5" Circle
3.5"AF, 1.5" Circle
3.75" AF, 1.5" Circle
4" AF, 1.5" Circle
4.5" AF, 1.5" Circle
4" AF, 1.5 inch Circle Base

Grapes and Cherries:
.5 inch Circle with loop of twine
2" AF, .5" Circle
2.5" AF, .5" Circle
2.25" AF, 1 inch Circle Base

Supplies:
Paper:Authentique, October Afternoon, Carta Bella, Simple Stories
Twine:Twinery
Glitter:Martha Stewart
Circle Cutter:Kreaxions

Scrap On!

~charity~


Wednesday, October 30, 2019

How To Make Unique Cards With Colored Burlap Shapes

Today's tutorial describes how to sew colored burlap into shapes for card making. The fibrous, loose weave of burlap adds wonderful texture to any project. The downfall of this fabric is the easy with which it ravels out. Follow along for step by step instructions to make sure your burlap keeps its shape.
Directions:
Step 1: Cut heart shape from canvas. Cut a burlap square ½ inch larger than the canvas. The extra material will prevent the burlap from raveling.
Step 2: Stitch the canvas shape to the burlap using a zig-zag stitch.
Step 3: Trim the burlap to fit the canvas.
Step 4: Add beads, running the thread between the burlap and canvas to hide it.
Step 5: Fussy cut wings from cardstock.
Step 6: Cut Sonnet Reverse paper to 8x6", fold in half. Adhere wings to card front. Center burlap heart on wings and adhere.
 Step 7: Die cut sentiment from Red Foiled Paper. Adhere to burlap heart.
~ Best Wishes ~
Directions:
 Step 1: Cut purple paper to 5.5 x 3.5". 
Step 2: Draw Diagonal lines on the back, about 1.75" apart. My lines correspond with the lattice design on the front. I used a paper piercer to mark them from the front, then connected the dots with a ruler and pencil on the back.
 Step 3: Pierce holes about 1 centimeter apart along the diagonal lines..
 Step 4: Stitch each diagonal line with Gold braid using a back stitch. Secure ends with tape.
Step 5: Cut White cardstock to 8x6", fold in half.
Step 6:Cut Flower Embossed Gold paper to 6x4", adhere to White cardstock.
 Step 7: Make hot air balloon with canvas, green burlap, and gold beads following directions illustrated above with pink heart. Adhere to card front.
Step 8:Die cut sentiment from kraft paper. Adhere to card front.
These two card are great examples for using colored burlap in cardmaking. Once you have the technique mastered use burlap shapes in scrapbooking, art journaling, upcycling, and even planning! View the original blog post on the CCB blog frim Fall of 2018.
Craft On!

~charity~

Saturday, October 19, 2019

How To Make A Caddy From Wire Baskets

Wire baskets quickly become a bathroom caddy when wrapped with burlap and ticking. A cluster of lavender wrap roses brighten the neutral color scheme. This trio of baskets performs a balancing act while tastefully organizing supplies. 
 Tools Needed:
Scissors
Straight Pins
Needle
Ruler
Lineman's Pliers
 Step 1: Remove the handles from all three baskets. Re-shape one of the handles for later use.
 Step 2: Measure the top tier of the basket. Mine was just over 3 inches.
Measure in from the edge of the burlap and pull one strand of the weave.
 Step 3: As you pull on the strand, the burlap will bunch and leave an easy to follow line. Cut along this line.
 Step 4: Weave the strip of burlap through the ribs of the basket, finishing with both ends inside.
 Step 5: Pin the ends together then use the pulled strand of burlap to stitch them. Trim the ends at an angle so they cannot peek over the rim of the basket.
 Step 6: Measure the lower tier of the basket and make a small cut in the ticking at the correct width. Grasp the ticking firmly and rip the fabric. The resulting edge will be slightly curled. Repeat Steps 4 and 5 with the strip of Ticking. I wrapped my ticking in an opposite pattern from my burlap.
 Step 7: Slide the Burlap and Ticking till the seams line up with the basket ribs.
 This will hide the seems quite effectively.
 Step 8:Fold the ticking and burlap away from your working area. Use a straight pin if necessary.
 Step 9: Hook the handle loop of the bottom basket through the base of the side basket. Wrap wire around the edges to stabilize. Use a large gauge of wire for heavier items. 
 Step 10: Place the reserved basket handle on the upper baskets. Re-shape the ends as needed.
 Step 11: Wrap and mist the roses.
a. Rip 3 lengths of Ticking 1.5"x 24".
b. Tie a knot at one end, leaving a 1" tail.
c. Fold the ticking in half and wrap it once around the knot, turning the tail to the bottom. Stitch the ticking in place.
d. Fold the ticking the opposite way, wrap and stitch again.
e. Tuck the loose end under the last wrap and stitch in place.
f. Mist rose with Amethyst Chalkboard Mist. Leave to dry.
 Step 12: Wrap the 1" tail at the back of the rose around the rim of the basket. Stitch the tail in place. If the roses slide too much make a couple loose stitches in the burlap at the back of each rose.
 To keep the caddy balanced place heavy items in the bottom basket with lighter items of similar weight in the top baskets. Slipping the handle over a wall hook will provide more stability.
 The serenity of the final photo shoot was destroyed with the swipe of a paw. Kitty was VERY unhappy to have been excluded from the process. He threatened to knock the caddy over if he wasn't given more screen time. Bowing to the wishes of my ginger diva, I have included a photo of his green eyed self. 
This project was orignially posted on the CCB blog in the fall of 2018

Craft On!

~charity~