Saturday, June 30, 2012

Beauty is Everywhere

A large kit of Lost and Found 2 from Scrapbook Steals came in this week. I have been having fun with the glitter paper and corresponding embellishments. This photo of the Oregon coast is so misty I added circles of tulle to mimic the movement of the waves.
~ Beauty is Everywhere ~

Papers, Pearls, and Diecut Title: MME Lost and Found 2
Butterflies and Birds: K and Company
Transparency: 7 Gypsies
Gems: CTMH
Tulle: Stash

~charity becker~


Friday, June 29, 2012

Design Team Announcement

So very happy to announce that I will be on Practical Scrappers July through December design team. Be sure to join us for lots of challenges and crafty tips!!!!!
These lovely scrappers will be on the team with me:
Danielle Higginbottom: http://piperloo.blogspot.ca/
Kimberly Congdon: http://www.scrapitgirl.com/
Stop by and give them a thumbs up!

~charity becker~


Thursday, June 28, 2012

Tic-Tac-Toe

Editing pictures after a vacation is never my favorite thing to do. There are so many different expressions in each photo. How to pick the best one? This Sketch by Juliana Michaels solves that problem with ease.
 ~ 3 in a Row ~

Paper: My Mind's Eye, Ooh La La
Alpha: American Crafts
Twine: The Twinery
Buttons: Basic Grey
Ink: CTMH

~charity becker~


Wednesday, June 27, 2012

No Respect

Life with two older sisters is hard. You just can't get No Respect!!!!!


All papers and alpha: Pink Paislee. Mist: Tattered Angels. Pearls and ink: CTMH.
 Trim: Michaels and Making Memories. Brads: Basic Grey. Twine: The Twinery.
Black jute: gift from Jennifer McDermott

~ charity becker~

Tuesday, June 26, 2012

Turquoise 8: Park Bench

I stopped by Stacy's Scrap Shack during our recent vacation to the west coast and found these delightful papers by Bo Bunny. They were fresh out of the box and I was happy to linger over their yummy colors and darling motifs. They matched this photo of us at the park perfectly.
~ Park Bench~

All papers, brads, and stickers are BoBunny, the stamps are CTMH, Hampton Art, and Kaiser Craft, the twine is from The Twinery, the gold embossing powder is by WOW, and the button, doilies, and stick pens are stash. The sketch is by the uber talented Kristy Lee of Scrapbook Steals.

~charity becker~

Monday, June 25, 2012

Today is my Birthday...

Today is my Birthday and I will do just EXACTLY what I want to do.

I will get up early and go for a run (no matter how slow I look to everyone else), because I am so happy my knee and foot have healed enough to allow me to exercise freely.


I will wear my new blue tank top because I LOVE that color and it makes me happy to wear it.

I will take my girls into town to their drama class 'cause I love that they are taking classes for something they love to do.


I will go for Coffee with Silas and thoroughly enjoy some time with just him.


 I will stop by the pharmacy and wait through their ridiculously slow process because I am so happy I can get Annalys the medicine she needs to help with her ADD.

I will take some time to scrapbook and enjoy every minute of it.


I will make "Pizza Chicken" for supper because Lori asked me to and because I love that dish also.


I will open gifts from my husband and children and enjoy their thoughfulness.

On my Birthday I will do what I do everyday, because I like what I do and I love the life I live.

Today is my Birthday and I will do just EXACTLY what I want to do.


Saturday, June 23, 2012

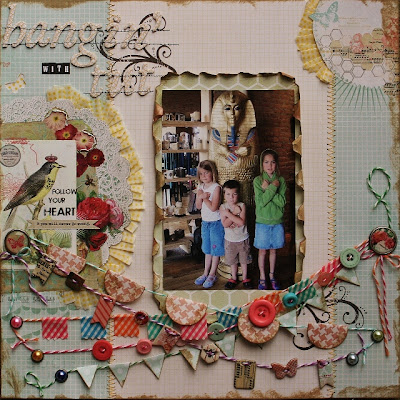
Hanging with Tut

Scrapbook and Cards Today offered a lovely sketch from Page Maps for their summer call. I had banners on the brain and a new shipment of MME so I got busy twining, cutting, stamping, and layering to come up with this happy layout.
All of the papers are My Minds Eye: Follow Your Heart, Be Happy. The brads, buttons, chipboard banner pieces, and orange twine are also from MME. The green, purple, pink, and blue twine are from The Twinery. The washi tape on the orange twine and pleated around the cut outs are Up and Up. The tiny type is EK Success and the alpha is American Crafts: Thickers. The circle punch for the houndstooth banner, flourish stamp, and inks are Close To My Heart. The pinking shears used for the washi tape banner are Fiskars.

~charity becker~

Friday, June 22, 2012

Fearsome Threesome

I had such fun with the DCWV Snapshot stack from their recent challenge that I had to pull out the papers again to interpret Kristy Lee's Turquoise #7 sketch.
~ Fearsome Threesome ~

Papers: DCWV. Punches:CTMH and EK Success. Twine: The Twinery. Ink: CTMH. Tiny Type: The Girls Paperie.

~charity becker~

Thursday, June 21, 2012

A Snake and a Smile

The bright happy colors of Authentique, Splendid set off this picture of my sweet girls and her wiggly captive perfectly. I used Kristy Lee's sketch for Scrapbook Steals, Turquoise #4.
~ A Snake and a Smile ~

Papers: DCWV, CTMH, and Authentique. Flowers: Immaginisce. Punches: CTMH and EK Success. Ribbon: May Arts. Ink: CTMH. Brads: Basic Grey. Liquid Pearls: Ranger.Twine: The Twinery.

~charity becker~

Wednesday, June 20, 2012

Hello Sunshine


~ Hello Sunshine ~
We have finally come to the end of the projects I made as a Guest Designer for Scrapbook Steals during their Graphic 45 Botanicabella and Playtimes Past promotion. Although this card is fairly simple it does take a little skill with the craft knife. I slit the edges of 6 of the butterflies wings then using the end of a pencil I curled the wings upward.

I inked the butterfly paper then adhered it to a dark paper from the collection. I wrapped the card with three strips of Twinery twine and added a sentiment using CTMH ink and stamps.

~charity becker~


Tuesday, June 19, 2012

Jam Face

My wonderful friend, Misty Buck was Scrapbook Steal's May guest sketcher. Of course her sketch was amazing and it was the first challenge on SS for National Scrapbooking Day. (View the sketch here.) I had a birthday party and studying for finals on the agenda so I didn't participate heavily in the festivities. I did duck into my Happy Hallway for this quick page of my daughter enjoying her toast.
~jam face~
The hydrangea flowers and hearts are punched from extremely thin mahogany. DH is a wood worker and brought me wood shavings one evening. "Can you find a use for this?" he asked. A very enthusiastic yes was my reply.
Supplies: cardstock, stash; patterned paper, DCWV, K and Company, CTMH, and Echo Park; washi tape, Up and Up; liquid pearls, Ranger; trim, stash; ink, Color Box and CTMH; punches EK Success; alpha, Thickers.
~charity becker~

Monday, June 18, 2012

PGCB: Favorite Vacation Spot

Today's challenge from the PaperGirl's Challenge Blog is sure to get your inspiration spinning. I took one look at the yummy idea and whipped out this layout in short order.

The circles are made from cardstock and Up and Up washi tape. I used Cuttlebug dies to cut multiple circle sizes. The background cardstock, photo mat, and alpha are American Crafts. The edges of the page are inked with CTMH ink. 

~charity becker~


Saturday, June 16, 2012

Parasol

The neutral tones of Graphic 45: Botanicabella lend themselves freely to bright colors. I took this photo of my daughter at a local import store. The pink parasol makes a vivid contrast with her green shirt. To compliment this startling contrast I paired pink cardstock with a dark pattern from the Botanicabella collection.
~ Parasol ~
 
To add to the drama of the photos presentation I printed the photo in sepia tone as well as full color. I trimmed the color photo 1/4 of an inch on each side. The color photo is adhered to the sepia photo with dimensional adhesive.
The photo mat is the opposite side of the hounds tooth paper misted with Tattered Angels, Black Cherry. The flowers are Graphic 45 Staples with Recollections fibres on the edges of the petals. The brads are all Basic Grey and the cardstock is inked with CTMH ink. The title is Thickers laced onto the page with twine from The Twinery.

~charity becker~

Friday, June 15, 2012

Smile for the Camera

Wednesday I posted a sweet little shadow box that celebrates each tooth as it is lost. The shadow box included a photo banner with removable pieces. The photos are already matted and embellished so adding them to a page is a snap. I placed the photos on this page in a diagonal pattern, added a banner and a couple flowers with some GORGEOUS May Arts ribbon and voila...finis!
~ Smile for the Camera ~

Supplies: all papers, DCWV Snapshots Stack; all trim, May Arts; punch and ink, CTMH; flowers, Imaginisce; brad and buttons, stash.

~charity becker~

Thursday, June 14, 2012

Hexagon Box Tutorial

~ Lost Teeth ~
Yesterdays post was all about the DCWV / May Arts Craft Challenge. This hexagon tooth keeper was part of my entry. Take some time to read the following post and you'll be a top-notch hex box maker in no time!!!
~ Top ~
Supplies and Tools:
paper trimmer with scoring blade, ruler, hexagon templates, cardstock, adhesive
Step 1: Follow this link, Hexagon Happiness, for instructions on downloading and printing hexagon templates. You will need the large hexagon template for this part of the box. It is best to make this box from plain cardstock or scrap paper for your first try.
Step 2: Trace and cut a large hexagon from cardstock. Measure one of the outside edges. Subtract this amount from 2 inches. (My amount was 3/4 of an inch). Score the hexagon at this measurement from the outside edge. I've highlighted the score marks with pencil on the following image.
Step 3: Lay the hexagon so a flat edge is on the top and bottom. Trace a straight line through the intersection points of the score marks.
Step 4: Repeat step 3 for each edge of the hexagon. Number the lines on the right of the flat edge of the hexagon in order from 1-6.
Step 5: Letter the lines on the left of the flat edge of the hexagon in order from A - F.
Step 6: Make a large dot at each intersection of the numbered and lettered lines. Cut the numbered lines from the edge of the hexagon to the dot.
Step 7: Fold the edges of the hexagon upward at each score mark. This will be the sides of the box top. Make a fold at the lettered lines so that a diamond shaped flap of cardstock is folded toward the inside edge of the side of the box.
Step 8: Place adhesive directly on the number. Press both edges of the hexagon together so that they make a corner of the box side. Repeat for each edge of the hexagon.
~ Bottom ~
Supplies and Tools
paper trimmer with scoring blade, ruler, hexagon templates, cardstock, adhesive
Step 1:Follow this link, Hexagon Happiness, for instructions on downloading and printing hexagon templates. You will need the large hexagon template for this part of the box. It is best to make this box from plain cardstock or scrap paper for your first try.
Step 2:Trace and cut a large hexagon from cardstock. Measure one of the outside edges. Subtract this amount from 2 inches. (My amount was 3/4 of an inch). Cut the hexagon at this measurement from the outside edge. This measurement needs to be exact because a hexagon has six sides and we will need 12 inches of paper to make the box sides.
Step 3:Cut a strip of cardstock, 2 inches by 12 inches. Score the length of the strip of cardstock, 1/2 inch from the edge.
Step 4:Score the width of the strip of cardstock every 2 inches.
Step 5:Cut the 1/2 inch side of the strip of cardstock along each score mark. Be EXTREMELY careful not to cut past the 1/2 inch lengthwise score mark.
Step 6:Fold the 1/2 inch by 2 inch flaps of cardstock upward.
Step 7:Adhere the flaps of the cardstock strip onto the hexagon from Step 2. If the corner where the sides of the box meet is not secure, place a piece of tape inside the box.

Leave me a comment if these instructions are not clear enough and I will revamp them. I appreciate your assistance greatly!

~charity becker~


Wednesday, June 13, 2012

Tooth Tales

I am very excited to have been chosen to participate in the DCWV / May Arts Craft Challenge. Stop by the DCWV Diary and the May Arts blog to view all the entries.
The paper and ribbons I received were so perfectly matched, and such fun designs that I had my project put together the day after I received my supplies. If you see the DCWV Snapshot stack at your local store, snap it up!!!
~ Tooth Tales ~
This cute little shadow box includes a box for keeping teeth and a list with a space for the date of each tooth lost. The ribbon holding the photo banner is tied and slipped over a hook in the back. It's super easy to slip off the photos and add new ones as he loses more teeth.
Supplies: all papers, DCWV; all trim May Arts; alpha, American Crafts; numbers, EK Success; tiny type, The Girls Paperie; ink, CTMH.
~ lost teeth ~
How about that cute little hexagon shaped box? I'm sure you've got a project that could use a little pizazz. Stop by my blog tomorrow and I'll have the details on how you can make your own!
Then on Friday and I'll show how easy it is to make a scrapbook page with the photos after you slip them off the ribbon.
~charity becker~


Tuesday, June 12, 2012

love that tiny SMIRK

Creative Scrappers sketch #208 second try. The first try with this sketch left me with a layout that didn't seem to resemble the sketch at all. I did come up with a new flower and used some new Makuba ribbon. For this attempt I went with Authentique, Genuine and a contrasting homespun-gilded look.
~ love that tiny SMIRK ~
The ribbon roses are made from stash trim, the chipboard flourishes are American Crafts, the alpha is Making Memories, the tiny type is Authentique, the dimensional paint is by Duncan, and the burlap is a yard sale special.

~charity becker~


Monday, June 11, 2012

MCM # 83: Especially For You

Another project from my Guest Design spot on Scrapbook Steals. For this card I followed MCM #83 by Kristy Lee. The punch is EK Success; stamp and inks are CTMH; the circle element is from the Botanicabella diecuts page; the trim is Graphic 45 Staples; and all patterned papers are Graphic 45, Botanicabella.

~ especially for you ~

~charity becker~

Saturday, June 9, 2012

Bell Flower Tutorial

Scrapbook Steals Mid Week Mojo's really keep me interested. I love all that Kristy Lee does. Every week she wows me with another amazing sketch. This layout was inspired by Turquoise #3.
~ comfy ~
I've been playing around with a new type of paper flower and am feeling MUCH better about this example then I did about the first one. Bell Flowers are SUPER easy to make.
Step 1:Punch out 5 circles. I use a 1.25 inch circle punch from CTMH.
Step 2:Distress the edges.
Step 3:Make a single straight cut from the edge to the center of the circle.
Step 4:Over lap the cut edges so that the punched circle becomes a cone, adhere.
Step 5:Thread a needle with crochet thread, twine, jute, or raffia; String the thread through the center of the cone and pull till the end of the twine is level with the inside rim of the cone. Adhere the twine to the under side of the cone. A small stripe of tape will be easiest. Leave the end of the twine inside the cone loose.
Step 6:Cluster the bell flowers in an alternating pattern, use dimensional adhesive for the ones "in the back".
Supplies: stamps and ink, CTMH; ribbon, Mokuba; gems, Recollections; paper doilies, Dollar General; all other supplies, My Minds Eye.

~charity becker~


Friday, June 8, 2012

Grateful

This card is from my Guest Designer spot on Scrapbook Steals for Graphic 45. The plan for the cards that were featured on the blog was quick and easy. This card looks SO classy, but went together in less then 10 minutes. The most time consuming part of the project was inking the components.
~ Grateful ~
Supplies: patterned paper, Graphic 45; stamps, MME and CTMH; ink CTMH.

~charity becker~

Thursday, June 7, 2012

Turquoise #2: Egg-ceptional

I put this layout together after completeing all the detailed projects for my guest designer spot on Scrapbook Steals. I wasn't willing to sacrifice quality for simplicity, but I was ready for a scaled back look. The kraft paper with spring colors fit my subject and my mood egg-sactly. This was my take on Kristy Lee's Turquoise #2 sketch.
~ my Dad is Egg-ceptional ~
Supplies:  cardstock, patterned paper, kraft border strips, MME; alpha, Thickers; tiny type, Making Memories and Glitz Design; star brads, Creative Impressions; liquid pearls, Ranger; twine, The Twinery; crochet thread, stash; ink, CTMH.

~charity becker~


Wednesday, June 6, 2012

Grateful

The main tones in Graphic 45's Botanicabella collection are very earthy. But taken out of context the papers can be QUITE flirty. I paired the black houndstooth paper with pink twine from the twinery and a couple of Basic Grey brads and Ooh La La this card is divaliscious.
~ Grateful~
The sentiment stamp and inks are all by Close To My Heart.
~charity becker~

Tuesday, June 5, 2012

Song in my Heart

Here's another project I did for the Scrapbook Steals presentation of Graphic 45. My goal was to illustrate how a clean and simple style can be employed with the extremely detailed designs that Graphic 45 offers.
~ you are the Song in my Heart ~
Supplies: patterned paper and large alpha, Graphic 45; small alpha, Creative Memories; heart punch, EK Success; twine, The Twinery; ink, CTMH.

~charity becker~

Monday, June 4, 2012

Paper Girls Challenge Blog: 4th Grade

It's that time again. Click on over to the Paper Girl's Challenge Blog to check out this weeks challenge. Leave us a comment while you are there, we LOVE hearing from our participants!
~4th Grade~

Confession time...I've never done "Subway Art" before this challenge. I even had to ask what it was. I was all set to graffiti up my own page. Then I got the explanation...True Story!~
Supplies: CTMH cardstock and patterned paper, Daisy D's rub-ons, The Twinery twine, Thickers alpha, Spare Parts brads, Petaloo flowers brushed with Color Box pigment ink or misted with Tattered Angels Patina.

~charity becker~

Saturday, June 2, 2012

Precious

Precious

This hexagon is edged with Colorbox chalk, Chestnut Roan and set with Making Memories eyelets. The title is Making Memories, the shell and fish are edged with CTMH ink, and the fish net is a piece of produce bag. The trim is Graphic 45 Staples and the burlap is stash. The twine on the bottom is MME wrapped around 2 Basic Grey brads.
The technique I used on the photo is a new favorite. I placed the picture in a Cuttle Bug embossing folder and ran it through my embosser. After I removed the folder I sanded the raised edges of the photo to enhance the shell design.
~charity becker~

Friday, June 1, 2012

Live Your Dream

Todays hexagon is mostly embellished with ink and stickles. I love the look of a subject cut from a photo and placed into a fantastical setting. This piece of paper was perfect for that technique.
Live Your Dream

This hexagon is edged with Colorbox chalk, Chestnut Roan and Making Memories eyelets. The stamps and ink used on this page are CTMH; except for the crown stamp which is Hot Off The Press. For the garden path and the flower I dipped a sponge in ink and rubbed it on the page.
The Stickles used on this page are Diamond, Lagoon, Orange Peel, and Black Diamond. The stickles on the butterfly wings and the bird are more of  a suggestion then a dimensional statement. After applying the stickles to the paper I used the tip of my paper piercer to spread the gel so that the entire object would sparkle.
~charity becker~