Wednesday, August 31, 2016

Adventure Awaits

Autumn is my favorite season.
I live for long walks on those cool, clear days! 
Then there is the back-to-school, harvest, pumpkin everything...
yep, it's my favorite!
~ Adventure Awaits ~
I used Kreaxions punches and circle cutter to recreate that feel for this card.
For the sunshine I used Punch # 902 around the edge of a 5in circle. I connected the punched designs with a craft knife. I cut the resulting doily and inked the edges. 
The clouds started with a 4in circle and Punch #920. I layered them at the top edge of the card and under the sun.
Stop by the Just Imagine Blog to view more great stuff!

Supplies:
Paper:Craftsmith
Twine:Pick Your Plum
Chip Board:Simple Stories
Tiny Type:Authentique and Carta Bella
Ink:Close To My Heart
Punches and Circle Cutter:Kreaxions

Scrap On!

~charity~


Thursday, August 18, 2016

Tooth-In-Waiting

Today's project is a tooth holder I concocted from a baking soda tin. Gotta keep those pearly whites looking fabulous for when the tooth fairy arrives!!!
~ Tooth-In-Waiting ~
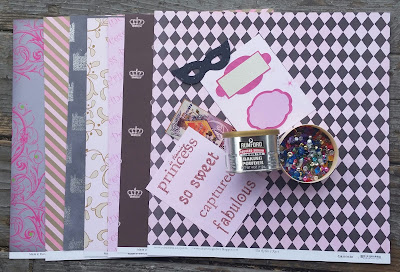
To begin I selected a variety of girly papers and necessities from my Robin's Nest stash of products.
Step 1: Remove and discard the lid and label from a 4oz Baking Soda container.
Step 2: Spread adhesive around the can opening, dust with glitter. Before it dries add large dots of glue on top of the glitter and place Metallic Pink Dew Drops.
Step 3:Cut Girl Swirl Glittered Cardstock to size and adhere to can. *Wrap twine around the paper while the glue is setting to get a firm bond.
Step 4: Cut label from Princess Cardstock, ink the edges and adhere to can. Cut crown from Girl Crown Glittered Cardstock and adhere to label. Add lavender Precious Girl Diamond Dew Drop and pink Daughter Mini Dew Drops to label. Add trim around base of label.
Step 5: Cut a strip of paper 1.5 by 6" from Rosy Chevron Cardstock. Cut a 1.25 by 5" and a 1.25 by 7" strip of paper from Rosy Diamond Carstock. Roll strips of paper around a chopstick for shape. Adhere with a 1/4 inch overlap.
Step 6:Cut words from Girl Word Titles and adhere to paper straws.
Cut castle from Silver Castles Glitter Cardstock and adhere to trimmed Baby Girl Tag.
 Add Mettalic Silver Dew Drops. Adhere to paper straw.
Decorate Black Mask Die-cut with glitter glue.
Adhere to paper straw, add flower and glitter floss.
Cut flourish from Pink Swirl with Green Cardstock.
Apply letters. Adhere to paper straw.
Step 7:Adhere paper straws to back of can with hot glue. Gift this Tooth-In-Waiting can to a lucky little girl!!!

Scrap On!

~charity~

Wednesday, August 17, 2016

All The Best

Today's project is a Mason Jar card.
~ Wishing You All The Best ~
To make this card I stamped the mason jar twice. 
Once on the card front and a second time, on green paper.
With a bit of work with my craft knife I had second dimension for my card. I used dimensional adhesive to pop it up. I over stamped when I was adding the dandelion wishes so I tied on a twine bow and called it good.

Supplies:
Paper:Craftsmith
Stamps:CTMH, Little Yellow Bicycle
Alpha Stamps:Mason Row Pegs
Ink:ColorBox
Glitter Glue:Ranger
Twine:stash
Border Punch:Kreaxions #902

Scrap On!

~charity~

Thursday, August 4, 2016

Not Forgot

Today's project is a mini-album to commemorate those fur babies that have gone over the rainbow bridge.
~ Not Forgot ~
For this project I began with the Chipboard Frame from Gina's Designs.

I spread glitter paste across the surface. Before that dried I added glue and a dusting of large glitter.

For the album I cut 5.75" circles from
Black and White Thermal Animal Cardstock
Rosy Diamond Cardstock

Pink Zebra Glitter Cardstock

Black and White Glitter Paws Cardstock
Pink Glittered Leopard Cardstock

I adhered the circles back to back and added washi tape around the edge.
For the hinge I punched 8 circles, 1.25" in diameter and glued them back to back.
I used brads to attach the circles between the pages.
For the the outer hinge I punched a couple 2" circle and glued them back to back. I used brads to attach the large circle to the first and last pages.
To complete the project I I die-cut a butterfly from the Khaki Glitter Cardstock, and rolled it through a paper crimper.
 I put a touch of glitter paste on the wing tips and dew drops down the middle.
To finish the album I adhered the frame to the front page then added the butterfly.
This album was easy to assemble with all the animal motif cardstock options from The Robin's Nest. Now I have a gift on hand to cheer a friend who has had to say goodbye to a four legged companion.

Supplies:
Cardstock, Dew Drops: Robin's Nest
Chipboard Frame: Gina's Designs
Washi Tape:Love My Tapes
Glitter Paste:Bo Bunny
Confetti Glitter:Stampendous
Brads:Spare Parts
Tiny Type:Authentique
Circle Punches:CTMH
Butterfly Die, Circle Cutter:Kreaxions

Scrap On!

~charity~