If you like personalized writing supplies then here is what you need to know to make an attractive notebook cover. I get tired of the primary colored spiral bound notebooks that look JUST like everyone else's. I go through too many to buy only the fancy style. Pretty paper and trim is how I solve any problem, so here is the answer I came up with.
5x9 piece of acetate, thick product packaging is ideal.
2 pieces of cardboard:8x11in
1 piece of
Rosy Chevron Cardstock for binding:4x11in
2 pieces of
Rosy Chevron Cardstock for inside of cover:8x11in
2 pieces of
Girl Crown Glittered Cardstock for outside of cover:8x11in
1 piece of
Spring Stripe Cardstock for matting:6x9
1 piece of
Silver Castles Glitter Cardstock for background:6x9
1 chipboard frame:4in wide
1
Doillie Die-Cut:2.5in wide
1 crown punched from
Gold Glitter Chipboard
Glue Chevron cardstock to cardboard.
Let dry while prepping front cover.
Front Cover Cut and Assembly
Step 1) Cut out center of Spring Stripe cardstock matting so that a 1.5in frame remains.
Step 2) Glue matting to Castle cardstock.
Step 3) Cut center of Crown cardstock
so that a 3.5in frame remains.
Step 4) Glue Crown cardstock to matting.
1/4in of Spring Stripe matting should show
between Crown cover and Castle background.
When gluing the layers of cardstock together and to the cardboard use
ScraPerfect's Best Glue Ever. It requires very little glue, does not wrinkle the paper, and holds fast.
Corner Supports
Step 1) Cut two circles from the acetate, 4in diameter.
Step 2) Cut 2in centers from circles.
Step 3) Cut circles in half.
Acetate doesn't show up well in photos so I used Sharpie to mark the edges. To remove the unsightly smudges I used
ScraPerfect's Best Cleaner Ever.
Step 4) From the outside of the cardboard cover pierce two holes that are 1.5 inches from the corner and .5in from the edge of cover.
Only pierce holes in the 2 corners
furthest from the notebook spiral.
Step 5) Insert brads to enlarge holes.
Each cover will have four brads.
Step 6) Adhere Crown cardstock to outer cover, leaving a 3x11 in strip of
cardstock unattached, for assembling corner supports. This 3in strip
will be along the edge furthest from the notebook spiral.
Step 7) Use a paper piercer to mark brad holes from Chevron side of cover through Crown side of cover.
Step 8) Insert brads to enlarge holes.
Step 9) Lay acetate half-circle over pierced corner holes on the Chevron side. Fold edges around cover so they meet in the front between Crown cardstock and cardboard. Crease acetate.
Step 10) Mark holes with sharpie, remove acetate and pierce only the folded ends.
Step 11) Insert brads to enlarge holes.
Step 12) Reposition acetate on corners, line up holes.
Step 13) Add glue to 3x11in strip of cardboard and acetate, carefully circling pierced holes.
Step 14) Smooth Crown cardstock over cardboard and acetate.
Use toothpicks to pin layers together as
you straighten paper and line up holes.
Step 15) Gently press brads through Crown cardstock and acetate, into cardboard. Fold points over on the chevron side.
Cover to Notebook Attachment
Step 1) Set eyelets on the corners nearest the notebook spiral, .5in from each edge. There will be two eyelets per cover.
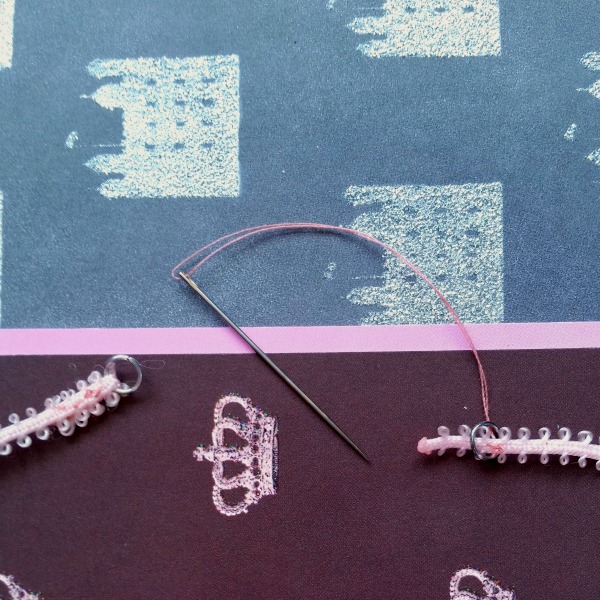
Step 2) Stitch one edge of trim around a jump ring.
Attach lobster claw clasp.
Step 3) Thread the raw end of the trim as follows:
Through the top eyelet on the Crown side of the front cover
Over the top edge of the notebook front
Into the top hole of the notebook front
Run the trim down the front of the notebook
Back out the bottom hole of the notebook front
Over the bottom edge of the notebook front
Into the back of the second eyelet
Back to the Crown side of the front cover.

Step 4) Determine appropriate length of trim,
Figure an extra .5in for stitching the raw edge
and another .5in for ease of fastening.
Step 5) Cut trim and stitch a jump ring onto the raw end.
Step 6) Attach ends together using Lobster Claw Clasp.
In order to switch the Cover between notebooks the second jump ring must fit through the eyelet with the trim attached.
Choose your rings and eyelets accordingly.

The notebook corners may catch on the brads as they are placed in the corner supports. Gently reposition them. They should be fine once the cover is attached to the notebook.The finished project won't show your fancy threading work. It will,
however, hold the cover securely to any regular size spiral notebook
.

Binding
Step 1)Center the 4x11 piece of Chevron cardstock
against the holes of the notebook.
Step 2)Mark top and bottom hole on long sides of cardstock.
Step 3)Cut .25x1in slit from the long edge
of cardstock towards center.
Step 4)Curve the cardstock over the spiral,
between the notebook and the cover.
Step 5)Wedge the long center tab
between the trim and the notebook.
Cover Embellishment
I used an oval chipboard frame, the reverse
side of a die cut doily, and a punched crown.
Step 1) Spread a VERY thin layer of the Best Glue Ever
onto the frame and let it dry until it is clear.
Step 2) Place a sheet of
Holographic Transfer Foil
over the frame, color side up.
Step 3) Rub surface to ensure foil is well stuck
to glue...do not skimp on this step!!!
Step 4) Pull foil off quickly. Repeat for
any large areas that you missed.
Step 5) Paint a thin layer of glossy dimensional medium over the top to seal the foil and cover any remaining bits of sticky.
Step 6) Punch the crown from Gold chipboard,
and carefully center it on the doily.
Step 7) Glue doily and frame to Castle background cardstock.
The Best Glue Ever is so versatile it can
be used for all parts of this project