Saturday, May 26, 2018

Silhouette Style Foiled Paper ATC's

Today's project is a set of silhouette style ATC's made with Rinea Foiled Paper. I added the Blush/Gold Foiled Paper to the Pastel Variety Pack  to make an even four cards. I love the spring tones of these foiled papers. 
I cut four ATC blanks (2.5x3.5") from white cardstock and four foiled paper blanks (2 3/8x3 3/8"). I laid the die on the foiled paper so that part of the shape was hanging off. I added a heart cutout in the upper corner then punched flowers from each of the foiled paper colors.
Directions: 
Step 1: I glued the foiled paper to the ATC blank, leaving a rim of cardstock around the foiled paper. 
Step 2: I glued three flowers to the side opposite the animal.
Step 3: I tied a bow of gold braid between the heart and animal.
Step 4: I added glitter glue to the center of the flowers.
 These ATC's are simple enough to make and would be lovely to trade. Punch a hole through the heart and tie one onto a gift bag or wrapped present. These make quick thank you notes to teachers or coworkers and are so much classier than a post-it!
Stop by the Rinea blog for more ideas.
Supplies:
Cardstock:Craftsmith
Foiled Paper:Rinea
Cutting Dies:Peachy Cheap, Amazon
Punches:Kreaxions, EKSuccess
Gold Braid:Michaels

Scrap On!

~Charity Hotrum~

Friday, May 25, 2018

How To Make a Mixed Media Layout with Word Sticker Doilies

Today's project is a mixed media layout with doilies die-cut from word stickers. The Tattered Walls Kit from 123 Scrap With Me comes with a pack of Tim Holtz Idea-ology Clippings. I like the look of printed words so I have been scheming up ways to use the Clippings.
~ Big Adventure ~
 To begin with I placed TCW's Screen Print stencil on the center of BFS Tattered Walls: The Carolina Room patterned paper. I used Nuvo Embellishment Mousse:Toasted Almond to leave the image. I flipped the stencil over and pressed the excess mousse onto the upper left and lower right corners.
 The BFS:Mystic Wand Chipboard needed a bit of lustre. I brushed them with the Toasted Almond Mousse included in the kit. The product is a bit goopy so I used a tooth pick to clean out the intricacies. I also snipped off the tales of the wands so the chipboard would fit on my layout.
 In the upper left corner I layered a scrap of  with a bit of 7gypsies Architextures from the Library Junque pack, also from the kit. I added a chunk of the large Kaiser Craft Die-cut and topped it with a chipboard wand.
 The next part of the design looked ripe for a doily so I pulled out my Peachy Cheap doily dies. I pealed a chunk of Idea-ology Clippings stickers away from the sheet and placed them on cardstock. A few phrases were left behind so I re-inserted those.
 I cut two doilies from the cardstock/sticker mash-up. The die is rather intricate so it took several passes through my die-cut roller, but the final look is stunning.
 One of the doilies I placed to the left of the stenciled image. Mini pink flowers punched from BFS Tattered Walls:The Maid's Room are placed along the doily's edge. Bits and pieces from BFS Tattered Walls:Ephemera are clustered on the far edge of the doily to embellish the title:Big Adventure.
 The lower right corner is a scrap of BFS Tattered Walls:The Reading Room is sandwiched between tag and word Ephemera from BFS Tattered Walls. An accordion fold strip of paper and the second Mystic Wand over lay the cluster. Sitting on top like cherry is a pink rose, also from BFS.
 The second Clippings doily holds a cluster of ribbon, from the kit, two pink BFS roses, and a word circle from the Ephemera pack.
 This sweet conglomeration sits to the upper right of the stenciled image.
 The photos were my last addition. I cut them to 3x3 and matted them with scraps from the Tattered Walls kit. I wedged them diagonally into frames from the Ephemera pack.
 Beach Combing on a rocky shore is less romantic then a long sandy beach. It is full of drama, hard edges, and cold splashes. The neutral tones of the Tattered Walls Kit and the pops of pink mesh perfectly with the photos. Click on the link ^^^ to get your kit!
I flipped a sketch from Alda Stevens' for this layout.

Scrap On!

~Charity Hotrum~


Thursday, May 24, 2018

How To Make an Elegant Card that is Quick and Easy

Today's project is a mixed media card that is as elegant as it is easy to make. This Dragonfly Card assembles super fast with the Tattered Walls Kit from 123 ScrapWith Me. The sheen of Nuvo Embellishment Mousse adds a chic touch to the mix of dark and light neutrals. The large variety of phrases from Tim Holtz Idea-ology Clippings lets you add a sentiment quickly.

~ Lovely Time ~

Here is a look at the items I used from the kit:
Blue Fern Studios Tattered Walls:Apartment B

Blue Fern Studios Tattered Walls:Sun Room

TCW Stencil: Screen Print
Nuvo Embellishment Mousse:Toasted Almond
Tim Holtz Idea-ology: Clippings Stickers
To accommodate the dragon fly design I cut a 4 ¾ x6 ¾” card front from BFS:Sun Room I centered that on a 5x7” card blank in cream from my own stash.
I cut 6 squares of 1” and 4 squares of ½” inch from BFS:Apartment B. I arranged them on either edge of the card as shown.
Using a pencil I marked the center of the card as well as the center of the dragon fly stencil. I lined up the marks and added Nuvo Embellishment Mousse over the top.
This product is super easy to use. Dab it on with a finger, apply with a scraper, or use a paint brush.
 If you want extra texture on a project just flip the stencil over and press the excess product on to your project.
Each application offers a different finish. Clean up is a snap. 
Just rinse under running water and rub gently.
The dragonfly dried while I was cleaning off the stencil. I added a sentiment from the Idea-ology Clippings and my card was ready to send off.
The Tattered Walls kit is offered at 26% off list price. Stop by 123 Scrap With Me to see what other products you can find.
Scrap On

~Charity Hotrum~

Wednesday, May 23, 2018

How To Make An Industrial Grunge Layout


The Tattered Walls kit from 123 Scrap With Me has an Industrial Grunge edge to it, perfect for Mixed Media layouts. The combination of Nuvo Embellishment Mousse and TCW Stencil: Screen Print are perfect layered over the Blue Fern Studios papers. Stop by 123 Scrap With Me for a look at the kit. It begins shipping May 24th!

~ Challenge The World ~

The photo featured on this layout is my oldest daughter. She was going through a Jane Austen phase and needed a regency style gown to fulfill all her dreams. I agreed to assist with the sewing project on the condition I was permitted a photo shoot. An agreement was quickly made!
The base design for the layout is vertical strips of Blue Fern Studios papers. I used the Screen Print stencil and Lilac Lavender Nuvo Mousse on either edge of the large central strip. Using a binder punch I created a stencil with a piece of cardstock. I used it to create a line of circles from Coastal Surf Nuvo Mousse on the left side and Toasted Almond on the right.
The Tattered Walls kit includes an Architextures Junque Pack:Library. I cut the “door knob” vertically and used circle and hexagon cutting dies on the “tooled leather” piece. Doodling, a scattering of Ideaology phrases, and a twist of ribbon finish the photo frame.
Layering to the right of the photo includes a piece of Kaisercraft frame and more scattered phrases. I edged a scrap of BFS “The Library” with a postcard cut and inked. I slipped the dragonfly shape on the stencil under the edge of the frame. I used my finger tip to apply a thick layer of Nuvo Mousse in Toasted Almond.
I repeated the dragonfly and mousse process at the photos upper edge. The stencil retained some of the product so I patted it randomly across the layout. I machine stitched a line to the left of the photo, and added the drop light from the Architextures Junque Pack.
These are the items I used that are not found in the kit:thread, gel writer, circle and hexagon die, binder punch, grey cardstock doily.

Here is a look at the kit I received.
These three Nuvo Embellishment Mousse are my choice of kit Add-ons:
Coastal Surf
Citrus Green
Lilac Lavender


Scrap On!

~Charity Hotrum~


Saturday, May 12, 2018

How To Make a Sweet Card With Stunning Stencils

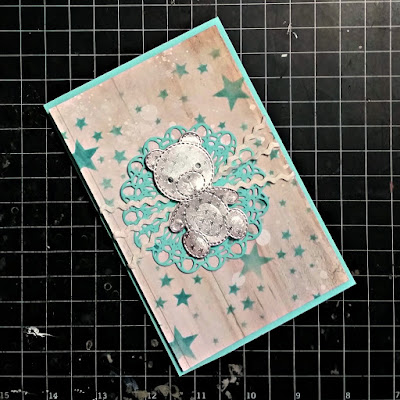
This sweet card uses a stunning stencil to deliver delight. The card base, sentiment, and large die-cut are from the same sheet of 12x12 cardstock. This trick simplifies the design and lets me spend more time on the background and layering.

~ Hello Hello ~

Parts and Pieces:
Card base 4x6"
Patterned Paper Card Front: 3 ¾ X 5 ¾"
Stencil
Dye Ink and Applicator
30” RicRak
Craft Foam
Die-cut Doily, Teddy Bear, and Sentiment
Best Glue Ever
No-Clog Writing Cap

Step 1:Dab ink through stencil placed over card front. 
Step 2:Adhere doily to card front, center. When layering a card I use ScraPerfect Best Glue Ever at the center but not around the edges. As it dries the doily edges will lift off the card front. This keeps the card from looking too flat and pressed together.

Step 3:Wrap ricrak around card front, tie at center, keeping knot low profile for layering over.
Step 4:Using Best Glue Ever and craft foam build a bridge on the back of the die-cut to span the knot. Leave to dry.

Step 5:Adhere die-cut to card front, then card front to blank.
Step 6:Use a No-Clog Writing Cap to adhere sentiment to card front.

The pale blues, grays, and silver tones of this card had me planning to send it off to a new mother. My daughter had other ideas. She swooped my pretty blue and silver card up and just HAD to have it to give to a teacher. I deemed that a worthy cause and off she went with her prize.
Supplies:
Cardstock:Recollections
Patterned Paper:49 and Market
Foiled Paper:Rinea
Stencil:Memory Box
Ink: CTMH
Rikrak:Vintage
Metal Cutting Dies:Peachy Cheap, Amazon
Craft Foam:Thrifted

Scrap On!

~Charity Hotrum~


Sunday, May 6, 2018

Mixed Media Delight With Poetry and Paint

Today's project is a mixed media delight of poetry and paint. I used an assortment of stencils with paint, mists, and embossing powder to prepare the background. Gear, star, and wing die-cuts add interest while rub-on alphas convey the poem.
~ What if you fly? ~
 The gears and stars, applied in three layers, are cut from scraps. Single and double layer foam dots give the cluster depth.
 Jade/Gold Glossy Foiled Paper and Turquoise/Gold Glossy Foiled Paper from Rinea are layered for the photo mat. 
 The wings are cut from Ebony Starstruck Foiled Paper and Silver Starstruck Foiled Paper, both from Rinea.
The poem, by Erin Hanson was written about 5 years ago and has sparked a host of illustrations. This is my rendition of the piece, and most likely will not be my last.
 This page is my entry Scrap The Boys Mood Board Challenge:

Supplies:
Patterned Paper:49 and Market, Blue Fern Studios
Foiled Paper:Rinea
Mist, Paint:Tattered Angles
Embossing Powder:WOW
Pigment Ink:Color Box
Stencil:Stencil Girl Products, The Crafters Workshop
Dies:Momenta, Spellbinders, Echo Park
Rub-On Alpha:Making Memories

Scrap On!

~charity hotrum~