Monday, July 24, 2017

How To Make A Beautiful Mermaid Pillow, Quick And Easy

Here's how to make a beautiful Mermaid Pillow Cover, the quick and easy way. Start with a Canvas Corp Brands pillow cover and the project will be done in an hour or two. Add vibrant color with High Impact Paint by Tattered Angels. The only difficulty is selecting which shade NOT to use.
~ Mer-Pillow ~
Supplies: Burlap Pillow Rectangle; 10" x 18" Pillow Form or Stuffing; Card Stock; High Impact Paint in Light Blue and Turquoise.
Tools: Wax Paper; Craft Knife; Washi Tape; Paint Brushes
Step 1: Print or draw mermaid silhouette. I used Whiteboard paper so I could redraw the lines until I got the angles just right.
Step 2: Cut out mermaid silhouette with craft knife and tape stencil to Burlap Pillow Rectangle. Cut 9" x 17" liner from wax paper. Insert into Rectangle to prevent paint bleed through.
Step 3: Use Stencil brush, sponge, or any blunt brush to dab Light Blue High Impact Paint onto burlap. Allow paint to dry 20 minutes.
Step 4: Dab Turquoise High Impact Paint onto burlap. Mix equal parts of both paint colors and dab onto burlap. Allow paint to dry 20 minutes.
Step 5: Remove Stencil. Use flat, stiff brush to dab Turquoise High Impact Paint around mermaid outline. Leave burlap to dry over night.
Step 6: Remove wax paper liner. Insert 10" x 18" pillow form or stuffing. Display Mer-Pillow with nautical pride.
  Supplies:
Cardstock:DCWV
Washi:My Mind's Eye
Paint:Tattered Angels
Pillow Rectangle:Canvas Corp

Scrap On!

~charity~

Sunday, July 16, 2017

How To Make Epic ATC's With Beautiful and Unique Foiled Paper

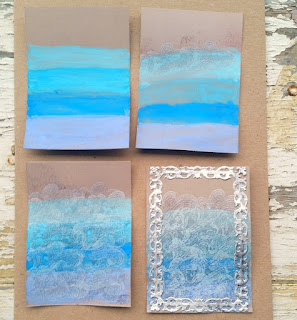
Today I am sharing how to make epic ATC's with Foiled Paper that is beautiful and unique. My theme for June's ATC A Day Challenge was Ocean. It quickly deteriorated into a chaos of unrelated ideas. Before it did I made this pair of ATC's with Rinea Foiled Paper accents.
~ Ocean ATC's ~
 Making the Fish ATC was fairly simple. First I punched the center then the opposite corners with detailed designs. I stamped and embossed fish then lined the card with Red Glossy Foiled Paper.
 I used the amazing glue from ScraPerfect to hold the slippery foiled paper onto the cardstock. The No-Clog Writing Cap helped me place very thin lines and dots of the Best Glue Ever exactly where I wanted them.
 The Ocean Waves ATC took several applications of product. First I painted stripes of watercolors onto the cards. Over that I stamped and then embossed layers of waves. The final step was a frame, die cut from Silver Glossy Foiled Paper.
Together, this pair of ATC's show how simple it is to add a bit of glow to any project using Rinea Foiled Paper!
Supplies:
Cardstock:Warehouse Paper Co.
Embossing Powder:Wow Embossing Powder
Ink:Clear Snap
Stamps:Inkadinkado
Punches:Kreaxions
Foiled Paper:Rinea
Watercolors:Close To My Heart

Scrap On!

~charity~


Thursday, July 13, 2017

How To Make An Absolutely Beautiful Gift Box

Here's how to make an absolutely beautiful gift box from Rinea Foiled Paper. The design mimics raindrop optical illusions. It is a bit tricky to line up the circles, but more than worth the effort. 
~ Illusions Gift Box ~
 The sides of this box are a series of fluted concentric rings, die cut from the Jewels Variety Pack of Rinea Foiled Paper. I glued them to Kraft paper in the two patterns below.
 Beginning with the open centered square, I cut a small circle from the side. I cut a corresponding circle from the foil centered square. I exchanged the circles between the two squares.
To complete the gift box I made 3 pair of squares with concentric fluted circles. The first pair had nothing removed. The second pair had one small circle exchanged. The third pair had two small circles exchanged.
 To enhance the party flair of the gift box I punched balloons from an alternate color of Rinea Foiled Paper from the Jewels Variety Pack. I glued Twine to the corner of the box. Over that I added the balloons so that they spread on either side of the corner.
 Here is a view of the Back of the box showing the inverse color schemes.
  
It is never too early to begin making Teacher Appreciation gifts. With an optical illusion theme this box will be just right for either a male or female recipient. My perfectionist 6th grader will be thrilled to hand over this lavish little number to his adored teacher. 
Supplies:
Foiled Paper: Rinea
Cardstock: Recollections
Ribbon: May Arts
Twine: Jillibean Soup
Best Glue Ever: ScraPerfect 

Scrap On!

~charity~

Thursday, July 6, 2017

How To Make A Quick And Easy Tower With Foam Blocks

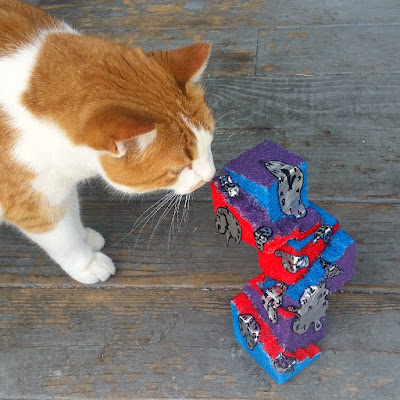
This tutorial on how to make a quick and easy tower using foam blocks makes a mess and creates a masterpiece! This month Rinea is collaborating with Floracraft: Make It Fun Crafts. I was given three foam blocks to create with and dug right in with my craft knife.
~ Escher's Clocks ~
If you have always wanted a piece of modern art, created by you then read right on through these directions and get started.
Supplies and Tools Needed:
Floracraft Foam Cubes of 3" each, Sharpie, Ruler, Craft Knife, Paint, and Silver Glossy Rinea Foiled Paper
 Step 1: Use a sharpie to mark a diagonal line that reaches around two sides of the foam block. Cut back the face of the foam block so that a 1/2 inch foam ledge protrudes.
 Step 2: Shape this ramp into steps by dividing the ledge into equal portions and leveling off each section. Cut the steps of the second block to rise opposite of the first and third blocks.
Step 3: Mark a square on the bottom of the second level of the tower. This square should extend from the under edge of the lower steps inward, to the center of the block. Carve away the block so that the square stands out 1/2 inch from the base. Repeat for the third level of the tower.

Step 4: Make a mark 1/2 inch from the edge of the upper-stair-side of the first block. Line up the square at the base of the second block with this mark. Trace the square onto the top of the first block. Cut a shallow crevice inside these lines. Test the pieces during carving, aiming for a snug but smooth fit. Repeat this process for the attachment between the third and second blocks.
 Step 5: Assemble the tower. The weight of the second and third block will balance each other out. Even though the tower levels hang over the edge of the one below, the tower will not tumble.
Step 6: Paint the blocks with bright colored acrylic paint. I used Tattered Angels High Impact Paint.
Step 7: Draw a variety of melted clock faces onto the Silver Foiled Paper. Cut out and attach the clocks to the painted foam. Form the foiled paper so that it appears to be dripping down the sides of the tower.

I discovered the best adhesive for this project is the Best Glue Ever. Other adhesives either didn't adhere to the foiled paper or didn't adhere to the foam. This project is a double whammy and a perfect test of the handy nature of ScraPerfect's glue. Squeeze a medium sized circle on the back of a clock. Let the glue dry to a semi-clear consistentcy before attaching the clock to the foam. Otherwise the glue will drip into the crevices and away from the foiled paper.

 If you have an appreciation for the surrealistic art of  M.C. Escher and Salvador Dali you will know this Never-Ending Tower and Melting Clocks are not my original idea. They are borrowed from the works of these great artists with my humble thanks and deepest admiration.

Supplies:Foiled Paper:Rinea
Foam Cubes:Floracraft
Paint:Canvas Corp Brands

Scrap On

~charity~