Showing posts with label perfect cleaning cloth. Show all posts

Monday, December 4, 2017

How To Make a Colorful and Delightful Batmass Party

Today I want to show you how to make a colorful and delightful Batmass Party. If you follow me at all on Facebook you know that I am 100% Bat-Crazy! I think these winged, furry, fruit and insect eaters are amazing. When Gerda Steiner Designs came out with their Bats Clear Stamp Set I knew I HAD to have them. Aren't they too cute for words with their little Christmas hats and goofy smiles?
~ Merry Batmass ~
  Gerda Steiner Designs also has delightful Digi-stamps and printables. I downloaded the free Christmas Tree and a couple of cute little mice and of course the Christmas Hats. Stop by the Shop or Facebook page to see what is available today!
My tiny glass house looks like a cathedral with a soaring roof and arched windows. I decided to run with that theme and turned it into a battery operated candle holder. I also spelled my title with the church idea in mind. If you look closely you can see the glow behind the tree!
Directions:
Step 1:Prep vellum for printer.
I used the Perfect Crafting Pouch from ScraPerfect to dust the vellum so the ink would set without smears.
Step 2:Prep vellum for painting. 
After printing my digi stamps I dusted the back of the vellum to prep for watercolors.
Step 3:Paint printed design from the back.
 Painting the vellum from the back of the design mutes the colors and adds to the glow of the candle design. The watercolors left the vellum rather warped. I cut out the tree and wrapped it around a paper towel tube to reform.
 Step 4:Stamp and cut Batmass Angels.
My Batmass Angels were super easy to make. I used white pigment ink and Rinea Foiled Paper in Ebony Starstruck. The bats cut out perfectly with the matching Bat Dies from Gerda Steiner Designs.
Step 5:Clean glass house.
My tiny conservatory is a thrifted item and it was FILTHY!
 I used the Best Cleaner Ever from ScraPerfect to remove the sticker and tape residue marring the glass.
 Step 6:Polish glass house.
After I washed it up I cleaned the fingerprints and water spots using the Perfect Cleaning Cloth. My little glass house looked brand new!
 Step 7:Add presents and party guests.
I had printed out and colored or painted the advent calendar several times. I used my extras for these cuties in the back. I fussy cut them and used foam tape to adhere them to the glass. The cookie mouse and balloon mouse are thrilled to be in on the party!
 Step 8:Cut and attach title, bats, and hats.
I used Emerald Starstruck Foiled Paper from Rinea and a Gothic alphabet die for the title. The Christmas Hats are printed on white cardstock with a bit of  Ruby Starstruck Foiled Paper pieced in the middle.
 Step 9:Attach tree to battery candles, add bling.
The tree needed a bit of sparkle to it. I used Embellie Gellie to pick up tiny star shaped gems for my tree. This wheel of gems is a Hot Buy for a limited time at ScraPerfect.
 One dot of Best Glue Ever holds the bling to the tree.
The tree is taped around two battery operated candles that give the tree support and shape.
 Step 10:Turn candles on and position tree in center of glass house.
The Batmass Angels are so excited to have the kids over for a Christmas Party! I hope you have enjoyed this little piece of fantasy and will stop by the linked shops for crafting supplies.

Supplies:
Cardstock:Recollections
Vellum, Watercolors:CTMH
Digi and Clear Stamps:Gerda Steiner Designs
Foiled Paper:Rinea
Glue, Cleaner, and Accessories:ScraPerfect

Scrap On!

~charity~

Wednesday, August 16, 2017

How To Make A Bright, Colorful, Worry Free Aquarium

This post on how to make a bright, colorful, worry free aquarium is for anyone who likes the beauty without the bother.  My kiddos are always wanting another pet, but not the chores that go along with it. Using stamps, pigment ink, and an empty jar I created an aquarium that will never need more than dusting!
~ Foiled Fish Aquarium ~
I knew I wanted a lot of different colors in my aquarium so I used the Jewels Variety Pack of Rinea Foiled Paper. This set has both glossy and star embossed papers. 
Pigment ink stamps easily onto Rinea Foiled Paper but is just as easy to smear. The good thing with that is a smear can be cleaned off and the same paper re-stamped. Heat embossing the Foiled Paper is tricky but with a light hand and a little practice it is no big deal. One tip is to emboss one image, or portion of an image at a time, allowing the paper to cool between.
I placed the largest piece of "coral" at the center of the jar then built out from that on either side. I used different colored paper for the fish and coral but the same stamp. This view of the side gives an idea of the many layers. 
To adhere the foiled paper to the bottom of the jar I bent the lower edge under and applied a thin line of the Best Glue Ever. After letting the glue dry to a semi-clear state I placed the foiled paper image in the jar and used a bamboo skewer to tamp down the glued portion.

The lid of the jar is more Rinea Foiled Paper that has been heat embossed with an ocean wave theme. The Foiled Paper waves were glued to the jar lid using the same Scraperfect glue.
Once again I found I could NOT take gorgeous photos of my project without the help of the Perfect Cleaning Cloth. Every adjustment left finger prints on the foil decorated lid or glass sides. After a really good clean I used the Perfect Cleaning Cloth to reposition the jar for each photo.

Supplies:
Foiled Paper:
Pigment Ink:Clear Snap
Embossing Powder:WOW
Stamps:All Night Media, Sheena Douglas
Jar:Smuckers
Glue:ScraPerfect

Scrap On!


~charity~


Wednesday, August 9, 2017

How To Make An Elegant Peacock From Colorful Flowers

Here is how to make an elegant peacock from colorful flower petals. During the month of August Rinea is collaborating with Petaloo by Floracraft. When I opened my parcel to the Cool Tones Floradoodles all I could see was the green, blue, and purple of peacock feathers.
~ Flower Petal Peacock ~
 
 Copper is my favorite metallic tone and the perfect compliment to my stash of flowers. How delightful that Glossy Copper Foiled Paper is available by the role from Rinea! Follow the steps below to make your own Flower Petal Peacock.
Supplies:
Glossy Copper Foiled Paper, cut to fit 7x11 Frame.
Foiled Paper in Contrasting color for Head and Neck
Decorative Corner Punch for edge of Peacock Body
ScraPerfect glue for attaching petals to Foiled Paper.
Assortment of Floradoodles in cool tones, cut into individual petals.
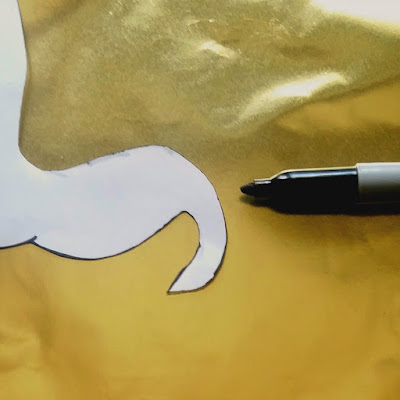
Draw or Print peacock silhouette. Trace onto foiled paper.
Place one drop of the Best Glue Ever onto each petal. Allow to dry to semi-clear finish.
 Add petals to the peacock silhouette starting at the tip of the tail and working upward.
 Trace the head and body of the Peacock Silhouette onto a contrasting color of Rinea foiled paper from the Jewels Variety Pack.
 Carefully cut out the shape. The curve of paper from the peacocks neck makes an excellent wing shape. Use corner punch for the lower edge of the body.
 Glue the body over the tail feathers, adjusting and filling in petals as necessary. Place short petals on head for top knot. Place Flower Petal Peacock in frame. Add layers of cardboard till foiled paper fits snugly without a wrinkle. Use Perfect Cleaning Cloth to remove finger prints from foiled paper.
Supplies:
Foiled Paper:Rinea
Flowers:Petaloo
Frame:Green Briar Int.
Corner Punch:Kreaxions
Adhesive and Cleaning Cloth:ScraPerfect
Scrap On!

~charity~

Saturday, June 10, 2017

How To Make Stunning Garlands for a Beautiful Mirror

Why not learn how to make stunning garlands of foiled paper to turn a basic wall hanging into a beautiful mirror? As a lover of vintage items with a weakness for trash to treasure, I am always looking for ways to spiff up my latest find. With my very first post for Rinea I decided this mirror had waited long enough for her chance to shine. 
~ Diva Mirror ~

 Because the mirror is in a dark corner it is used to add light rather than reflect a face. The garland draped over the front doesn't frustrate anyone's view. Having been constructed of foiled paper, this garland also helps with my light issues. It just keeps on giving! 
 The first garland is made in two pieces then joined at the back of mirror. It loops through the center of the carving and around the ends. It is constructed of Foiled Paper Beads. Each bead is a punched shape that is curved curved and then strung on coat thread. I knotted the thread at one inch intervals, stringing beads and knotting again.   
  The medallions I cut in half folded into cones. For the hearts I overlapped the rounded portions toward the center. Both are made from Blush Glossy Foiled Paper. To hold them together I took one stitch at the seam in the back as I strung them.
The circles and flowers I placed on a foam pad and pressed at the center with a marker or paint brush end. My pressing foam is an old mouse pad flipped over. The circles are Silver/gold Glossy Foil and the flowers are Copper Glossy Foil.
My second garland says Diva and is draped around the central carving on the frame. The letters were created with Rinea Sapphire Glossy Paper from the Jewels Variety Pack and were cut with a punch board.
 To strengthen the letters for stringing I added scrap cardstock to the back. The front of the letters I decorated with flowers and circles left over from the first garland.
  One drop of the Best Glue Ever from ScraPerfect is all it takes to hold the foiled paper together.
I also added drops of opalescent puff paint around the flowers and at the centers. 
  The third garland is a Moon Phase Strand. I punched 6 circles from the Rinea Silver /gold Glossy Paper and 9 circles from black cardstock. The garland is constructed in two pieces and joined at the front of the mirror. The full moon phase hangs from the joining.
I punched a circle from scrap cardstock and used the negative to trace the crescent onto two of the circles. I carefully cut off the crescent and had both the gibbous and crescent phases from one circle.
 The new moon is represented with a rim of foiled paper. I used a 1.25" punch and cut a 1" circle from the center. The moon phases and black circles are joined with tiny dots of the Best Glue Ever. It takes very little to attach them. 
Getting a clear photo of a mirror takes a couple tricks.
1) Polish the mirror with the Perfect Cleaning Cloth just before taking pictures.
2) Lay the mirror on its back so that it reflects a white ceiling or the sky.

Supplies:
Foiled Paper:Rinea
Cleaning Cloth and Glue:ScraPerfect
Thread:Coats and Clark
Letter Punch Board:WeRMrk
Punches:CTMH, Martha Stewart,
Uchida, and EK Success, 
Model:Noir The Black Cat


 Scrap On!


~charity~

Wednesday, May 3, 2017

How To Make an Epic Rose Suspended in a Bell Jar

If you want to know how to make an epic rose suspended in a bell jar read on! Projects that WOW are where it's at. A simple candle hurricane? A scrap of red paper? A squeeze of glitter glue? No! This is no ordinary rose, this is an enchanted rose...made by YOU!
The idea for this bit of fantasy was sparked by seeing a hurricane glass, face down, on a dusty thrift store shelf. Suddenly I could see the characters from that well known animation...and a rose, glittering and wilting as the time past. Of course it came home with me! 
The rose is a multi step process and frankly there are hundreds of rose tutorials on line. If you can stand reading another one, I can stand writing it. This project was made using ScraPerfect products. Substituting with a different adhesive would change the outcome.
Step 1: Cut/Punch 3 scalloped circles, pierce the center. Mine are 2.5" in diameter.
Step 2: Cut each circle into 6 even sections, leaving a 1/2 inch center. Roll the petals around a pencil or other cylindrical tool. Place a mini brad through the center to hold all three circles/layers together.
Step 3: ( Top Layer) Add a dot of glue to the right, underside of one petal. Fold that petal towards the center and overlap the sides to form the center of the rose. 
Step 4: Fold the remaining 5 petals towards the rose center, adhering each one around the center with dots of glue on the petal edges. For a more symmetrical rose, choose the petal opposite for each fold.
Step 5:(Middle Layer) Add a dot of glue to the right, top edge of every other petal. Fold and adhere those petals toward the center. The rose will resemble a blender blade.
Step 6: Add a dot of glue to the left, top edge of the remaining petals. Fold and adhere those petals toward the center.
Step 7: Wrap a hair band around the center of the rose until the glue had had time to cure. I left mine till the next day.
Fold the lower layer of petals towards the center, then roll the rim to the underside. This layer of petals should also be worked every other one, 3 at a time.
Step 8: Cut a strip of paper 1/4" wide and 12" long. Wrap it around a pencil to create a spiral.
Step 9: Pierce the end of the spiral stem, attach it to the bottom of the rose with the brad that holds the rose layers together.
Now that the paper rose has properly bloomed, the time has come to suspend it in the glass. Really though, this is the easiest part of the project. A line of glue on the back of each spiral is all it takes. Use a pencil to press the stem to the glass. The spiral stem creates an optical illusion that convinces the mind the rose is hanging in mid air.

The magic is all in the glue. The Best Glue Ever by ScraPerfect to be exact. Because BGE is flexible yet SUPER strong it holds the stem to the glass without hardening and releasing. Leave the rose to cure over night, lay the hurricane on its side and place a heavy cylindrical object (mine was a drill bit) in the spiral to hold it in place.
Hurricane Decoration 
Step 1:Stamp a flourish design on thin paper.
Step 2: Roll balls of Embellie Gellie. Flatten them on the inside of the hurricane, overlapping the stamped paper. The Embellie Gellie will act like tape without leaving residue on the glass.
Step 3: Trace the lines of the flourish with glitter glue.
Step 4: Use BGE to place Dew Drops along the flourish. Leave each portion of the design to cure for an hour or 2 before moving on.
The Perfect Cleaning Cloth is a life saver for glass projects. With a bit of a rub it removes finger prints, dust, and residue. I used my PCC several times during this project.
The primary colors and simple design enhance the beauty of this project. Wow factor is through the roof and you have your own enchanted rose to give or to keep. Lucky for you, this one won't wilt!
Supplies:
Paper, Dew Drops:Robin's Nest
Glue, Paper Tack, Cleaner:ScraPerfect
Hurricane Glass:Thrift Store
Glitter Glue:Home Made
Punch:Punch Bunch
Die:Echo Park

Scrap On!
~charity~